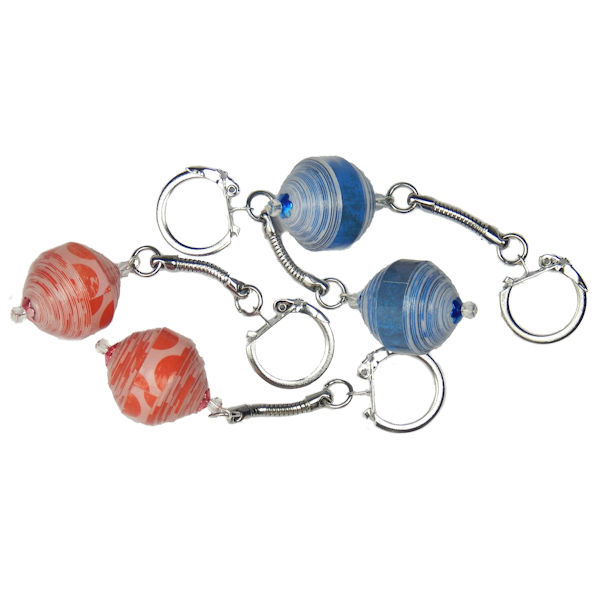
Large Paper Bead Key Chain

Designed By Julie A. Bolduc
This Large Paper Bead Key Chain is made with a bead that is about 1 inch in diameter. The paper used is Card Stock. This would make a great craft fair item or stocking stuffer!
- Materials Needed for 2
- 1 Sheet of Letter sized (8-1/2" x 11") Card Stock, will make 2 large beads1
- 2 Key Chain Parts
- 4 E-Beads or size 6/0 seed beads
- 4 metal end caps, mine were 6mm
- Glazing Supplies and white Glue
- 2 Head Pins, 2" long 20gauge
- Tools Needed
- Size 5/64" or the smallest Paper Bead Roller you can get
- Paper Cutting Device, scissors, guillotine cutter, rotary cutter, cutting mat, electronic cutter. Use what you want!
- Piece of copy paper if hand cutting your card stock using the printed paper template.2
- Provided Cutting Template
- Bead Glazing Tools of Choice.
- Round Nose Pliers
- Flat Nose Pliers
- Wire Cutters
Finished Size: About 3-1/2" x 7/8" / 9.5cm x 2.5cm
Skill Level: Intermediate, for those who have experience in rolling paper beads. You also should have some basic jewelry making skills as well.
Instructions
Step 1: Print out the template provided or cut your strips using your favorite method. You will get enough strips to make 2 large beads. There are 2 strips of each size with the largest ones on the left side of the sheet to the smallest on right hand side of the sheet. Set them in 2 piles putting one of each size in each pile. There should be 6 strips in each pile. The extra strips from your template can be rolled up and used in other projects.
- The sizes of the strips are as follows. All of them are 11" long.
- 1"w x 7/8"n
- 7/8"w x 3/4"n
- 3/4"w x 5/8"n
- 5/8"w x 1/2"n
- 1/2"w x 3/8"n
- 3/8"w x 1/4"n. The "w" is the wide end and the "n" is the narrow end.
Step 2: Get your white glue ready and start rolling your strips. Start with the largest strip and roll it up gluing the end in place. Leave it on your bead roller and pick up the next strip where the wide end is the same size as the narrow end of the strip already on the bead roller. Butt the ends of the strips together as you go for a smooth continuous surface. Continue rolling and do this with the rest of the strips for the first bead. Then repeat for the 2nd bead.
Glazing Your Beads
Glaze your beads using your favorite method. I actually string them on 50lb test fishing line and dip them. Usually I do 4 dips into PC-Petrifier and 2 dips into Liquid Laminate or Vibrance but for these beads I did the opposite. I actually dipped 2 times in PC-Petrifier just to enhance the color and harden the paper a bit. Then I dipped them 4 times into Liquid Laminate for a thick coating. I did this because key chains are handled alot! I wanted the finish to be as durable as possible without coating them in resin. Allow the beads to dry overnight before going onto the next step.
Assemble the Key Chains Step 1: Put a size 6/0 seed bead on a 2" head pin. Add the bead cap so it is facing away from the small bead. Add the large paper bead. Add the bead cap, add the 2nd size 6/0 seed bead.
Step 2: Make a wrapped or simple loop above the 2nd 6/0 seed beads and cut off the excess wire.
Step 3: Attach the loop just made to the jump ring of the key chain part if it is there. Otherwise you will need to add one.
1. Thickness of card stock does not matter as long as you use card stock. Copy paper is just too thin to get this fat roundish bead effect.
2.You can roll the template pieces into random beads to use in other projects so you will not waste any paper! I am using myelectronic paper cutting machine to cut my card stock.
Design written on August 7, 2015. Copyright ©2015 By Julie A. Bolduc f206006

