
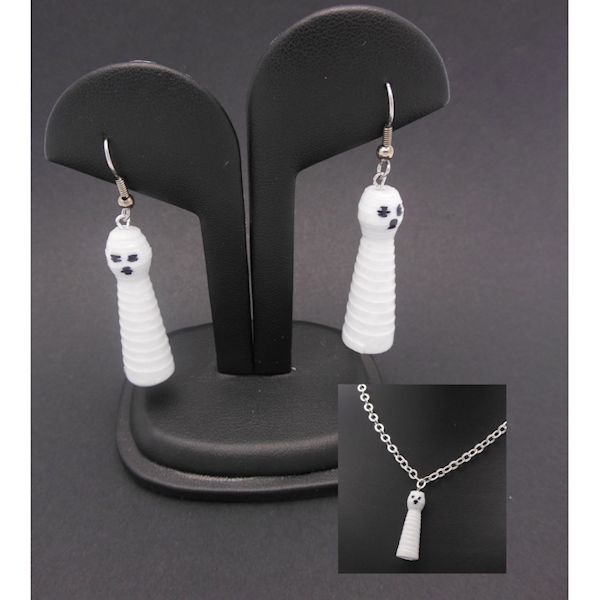
Paper Bead Ghost Earrings
Designed By Julie A. Bolduc
These earrings and necklace are fun to make and would be cute to wear at your Halloween Party! They are made with white card stock with the eyes and mouth added with a black permanent marker.
- Materials Needed
- 1 Sheet of white card stock will make 6 ghosts
- PDF file of Special Cutting Template
- Cutting Tool of Choice
- Paper Bead Roller, Size: 1/16" thick. Long Split Winding Pins
- Black Sharpie or other fine black permanent marker
- White Glue
- Glaze of Choice, I use PC-Petrifier and Janice Mae's Vibrance
- 1 Pair of Fishhook Ear Wires
- 3 Head Pins 2" Long Silver color
- 1 Chain at least 16" long w/Lobster Claw Clasp Included Silver color *
Finished Size: Ghost Beads are 1-3/8" Long
Skill Level: Intermediate
Instructions
Step 1: Print the template on a piece of recycled 8-1/2" x 11" paper. Make sure to tell your printer to print borderless to make sure you get all of the cutting lines to print on your paper. You do not need to use the templates if you follow these sizes for your pieces of card stock.
- For Each Ghost Bead, You Will Need
- 1 Piece: 1-3/8" x 4-1/4" rectangle for the core.
- 1 Piece: 3/8" x 1/16" x 5-1/2" for the Head
- 1 Piece: 1" x 1/16" x 11" as a right angle triangle for the body.
Step 2: Layer the template onto a sheet of white card stock and clip them together with mini binder clips to keep them from slipping out of alignment. Use your favorite method to cut them apart. I started with the long strips first then did the smaller ones moving the binder clips around as I needed to, to keep the layers together.
Step 3: The pieces are numbered in the order they are to be used. You will get 6 ghosts from each sheet of card stock. I like to pile my strips according to shape but you can pile them for each ghost.
Step 4: Start rolling your strips, starting with number 1. Roll that on your Long 1/16" paper bead roller. Keep the bead on the roller. This is the core of the ghost.
Step 5: Apply glue to strip number 2. This is the head. Add it to the top part, the end next to the handle of the paper bead roller and roll up completely, gluing just the end in place.
Step 6: Pick up a wide end strip and take notice of which of the 2 wide end corners are at a 90degree angle. This side of the strip is the bottom of the ghost. Make sure this side is to the left. Turn it over and apply glue to the back side just at the wide end. Butt it up against the edge of the core on the roller making sure the slanted side is next to the head and the straight side is at the bottom. Roll it up so it forms a flat bottom cone shape. Glue the end only in place. Do not take it off the pin yet.
Step 7: While the ghost is on the winding pin, go ahead and with your Sharpie marker, draw on the eyes and mouth to the head! Now you can take the ghost off the pin.
Step 8: Repeat Steps 4 through 7 for the rest of the ghost beads!
Step 9: Prepare your ghost beads for glazing. Glaze them using your favorite method! I dip mine. Watch the Glazing Paper Beads Video at YouTube!
Step 10: Assemble your earrings! Make 2. Put one bead on a head pin and form a simple loop at the top. Attach to your ear wires.
Step 11: Assemble your necklace. Put one bead on a head pin and form a simple loop at the top like you did for the earrings but this time attach it to a center link on your chain. If you need to, attach your clasp to the ends of the chain. I used a chain that already had the clasp attached.
*I used Fashion Accessories #34807-07 16"/40cm Chain from Wal-Mart for the necklace. It came with the clasp attached. The UPC number is 016321519268. You can use any length of chain you want. I just used this because it is what I had on hand.
Design written on September 16, 2014. Copyright ©2014 By Julie A. Bolduc f204001
Sheetworks Studio Version 2.5 — Free Download! - Two New Categories Added, Graph Paper and Quilt Blocks
All items in our online shop ship free within the US only. I currently offer U.S. shipping only and it is from rural Maine. Delivery can vary from 2–14 days depending on your distance from Maine. Expedited shipping is not available.
Please note: I am now selling all of my paper bead making tools and other items from this web site using Paypal payments.
I have removed all of my paper bead making tools from Amazon. My Kindle crochet pattern books and paper template paperback books continue to be available on Amazon, as they are printed and fulfilled directly by Amazon. A limited number of paper bead making tools remain available on Etsy but I am not linking to those tools from this site.
Random Quick Tip!
Deer RepellantWhen planting a garden, hang some nylon peds stockings near the plants with pieces of deodorant soap in them. This will help deter the deer and other animals from getting into the garden. They don't like the smell. You can also use small muslin drawstring bags available online. Just tie them on stakes near your plants.