
Rotating Carousel Paper Bead Drying Rack
 Designed By Julie A. Bolduc
This drying rack is made from a cPVC pipe, and some hardware. It is meant to work with dipping paper beads strung on monofilament fishing line. It is fairly easy to make and will hold as many as 64 strands of beads based on 8 strands of small beads per pin. It is very easy to compact for storage! Just drop the pins through the slots on the hub. Then tuck it into a corner or on a shelf to store it when not being used. It only takes up a 9" x 9" by 15" high bit of space!
- Materials Needed
- 1 piece cpvc pipe 3/4" diam x 12 to 22" long.
- 1 3/4" cpvc end cap fitting
- 1 3" PVC end cap fitting
- 8 Carriage Bolts threaded all the way 1/4" x 5-1/2" with 20thread
- 8 Cap Nuts to go with the Carriage bolts
- 1 washer 1" OD, 1/4" ID, 1/16" thick*
- 1 washer 1" OD, 7/16" ID, 3/32" thick**
- 1 washer 3/8" OD, 3/16" ID, .038" thick***
- 1 Flange Weld Nut 3/4" OD, 1/4" diameter Shank, 3/8" long
- 1 drawer pull or knob with a 3/4" deep hole
- 1 screw or bolt that goes with the drawer pull,
- Piece of 1" x 8" x 8" hard or soft wood
- Piece of Thin Cork 8" x 8" Square. I used Contact brand available at Staples
- Piece of Cereal box Cardboard 8" x 8" Square.
- Strong White Glue
- Spray varnish or clear glaze for base
- Acetone based nail polish remover
- 50lb test monofilament fishing line
- 2mm Crimp beads
- Mini Pony Beads and E Beads
- Tools Needed
- Miter Box and saw or a pipe cutter
- Black Sharp Permanent marker
- Regular Pencil
- Small Scrap of paper about 3-1/2" x 3-1/2"
- Small Scrap of paper about 1 1/4" x 1 1/4"
- Scissors
- Transparent tape
- Rotary Tool like a Dremel, Mine is a Craftsman
- A Dremel Multipurpose Bit #561, capable of cutting sideways as well as drilling
- Painters tape or masking tape
- Electric Hand Drill or Drill Press
- 9/64" drill bit
- 1/4" drill bit
- Screwdriver for bolt or screw that is being used for the drawer pull.
- 7/8" paddle type drill bit
- Sand Paper 80 and 180 - 200 grit
- Paper Towels for cleaning markings off of pipe.
- Chain Nose Jewelry Pliers
Finished Size: 12"w x 22"h x 8"
Instructions
Step 1: Using your miter saw or pipe cutter, cut your pipe to the length you want. I made mine 14-3/4" long. If you want to be sure you can hang 16" long strands, make your pipe 22" long.
Step 2: Clean the pipe with a paper towel moistened with the acetone. If you want to completely remove the writing on the pipe, you will need pure acetone. Nail polish remover is not strong enough. You can get pure acetone in the nail polish remover section of any major store. It is what is used to remove artificial nails! You can also get it in a can in the paint department of Wal-mart or other home improvement store. Set the Pipe aside for now.
Making the top Hub
Marking for the center Holes in both caps. (This is the way I really did my holes!) To get ready to mark your holes, you will need your 2 small pieces of scrap of paper and a marker.- Preparing Paper Templates for CapsTrace and cut out your small cap on your small piece of paper and trace and cut out your large cap on the larger piece of paper. Fold the little circle pieces of paper in half. Then while keeping it folded, fold in half again and then again one more time. You should have a small pie slice shaped folded piece of paper. Cut the tip off of each of the wedges. On the larger wedge only, cut the top 2 corners off about 1/4" from the edge. Open them up. You should have a piece of paper with 8 sections around. The small piece should just have a hole in the middle and the larger one should have a hole in the center and 8 notches evenly spaced around.
- Marking Center Holes On Caps Now you will mark where your holes will go on both caps. On the small cap, just line up your circle piece of paper as best as you can and with a marker, mark the center through the hole on the piece of paper. For the larger cap, line up the larger circle with the notches on the top of the cap and mark the center hole and put a dot at each notch around the edge of the cap. Set aside the large cap for now.
- Drilling Center Hole in Small Cap Using the 9/64" drill bit or the size needed for your drawer pull screw or bolt, drill your center hole in the small cap only. You want the screw or bolt to be tight in the hole. So tight you need a screwdriver to screw it in. This is important. You do not want it to be loose. With a screwdriver, screw your bolt through this hole so the head is on the inside of the cap with the rest of the screw coming out the top side. Set this aside for now. You will not be using this bit again so put it away.
- Drilling Center Hole in Large Cap with a 1/4" drill bit, drill the center hole in your large cap. It is important that it is centered as perfectly as possible for proper balance.
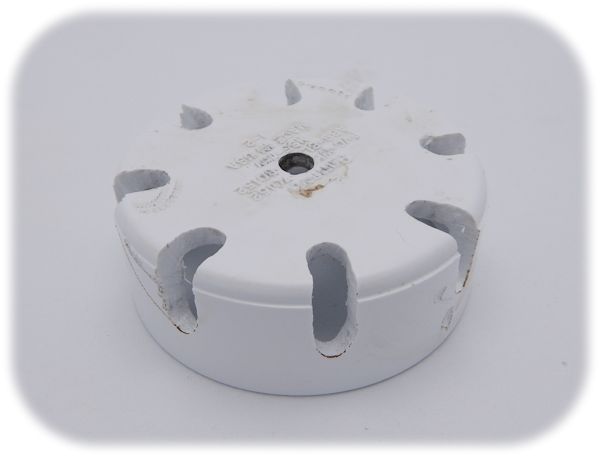
- Cutting the slots in the large PVC cap. This is the main part of your hub. It is what will hold the bolts at the top of your drying rack. Caution! The rotary tool is a very high speed and dangerous tool. It is very important you know what you are doing with the rotary tool. If you have never used one before, get help or practice on similar PVC parts to get the feel of how the tool works.
- Wrap a piece of painters tape around the perimeter on the bottom edge of the large cap so you are about 3/8" from the bottom edge. This is how low you are going to cut your slots down the side of the large cap.
- The top part of the notch will be 1/2" in from the top edge corner of the cap. The notch needs to be just a hair wider than 1/4" to accommodate the thickness of the carriage bolt. Mark a line 1/2" in toward the center from each marker dot you already made around the top edge.
- With your rotary tool and the Multipurpose bit, start cutting your notches working them slowly and carefully not to go beyond your markings along the tape and the top of the hub. Try fitting your bolts in as you think the slot is big enough. Take your time. Once you get used to the tool, it gets easier. By the time I was done cutting mine, my hand was tired so if you are not used to it. Give your hands a break about half way through. Look at the picture to see what is should look like when you are done. Now that you are done cutting the slots. Go reward yourself for a job well done! Get some coffee or something!
- Assembling the Rotating Hub Now you are going to assemble your hub!
- Pick up the small cap with the screw already in it.
- Put the smallest washer on the screw.
- Put the washer with the larger hole on the screw so the little washer is inside the larger holed washer.
- Put the third washer on top of the other 2 washers.
- Put the hub on top of the washers next.
- Put the Flange Weld Nut inside the hole in the center of the hub.
- Screw the drawer pull onto the screw. Tighten. Your hub is now assembled!
NOTE: If the spacing is right, the hub should spin on the flange weld nut without resistance and should not wobble. If it is too tight or loose, you may need to change your washers. Keep trying washer combinations until you find the one that will allow the hub to spin freely without wobble. If you want to, you can make it so you can tighten up the knob to lock it in place and when you need it to be able to rotate, just loosen the knob.

Step 4: Making the Base. You can cut your piece of wood into a circle if you want to. I already had my circle of wood from another project so I am recycling! Basically the first thing you want to do is find the exact center of your piece of wood and drill a 7/8" hole into it all the way through. If your hole ends up being a tiny bit big and your pipe wobbles in it a little, you can apply some kind of sealer inside the hole on the cut surfaces to swell and seal the wood. I used Janice Mae's Vibrance with a small craft brush because that is what I had on hand. I used only one coat and it was just what was needed to make my pipe fit perfectly in the hole without being the least bit wobbly.
Step 5: Decide now whether you want to seal your wood or leave it plain but at least sand it to make it smooth to prevent splinters later on. If you want to seal it, you can use what ever varnish or sealer you want. I used 3 coats of Plaid Patricia Nimock's Clear Acrylic Sealer Gloss for mine because again it is what I had on hand. Use what ever you want and how ever many coats you want. Remember, it's a drying rack and not pretty furniture.
Step 6: Trace your wood onto a piece of cereal box cardboard and cut it out. Glue this to the bottom of your wood base, with white glue, to cover the hole.
Step 7: Trace your cardboard covered wood base onto a piece of the thin cork and glue this to the bottom of your cardboard on the bottom of your wood base. You can use felt if you want to for this instead of cork but then use corregated cardboard to cover the hole instead of cereal box cardboard. The Contact brand of cork has an adhesive on it but it is not strong enough to stay put so add some glue to the cardboard as well. Or use contact cement.
Step 8: Now your bead drying rack is essentially done. You just need to assemble it so you can use it. Put your base on the table. Insert pipe into the center hole of your base. Place your assembled hub on top of the pipe. Insert each bolt from the bottom and put cap nut on each one as you go.
Step 9: To put your bead drying rack away, just pull push the bolts back down through the holes letting the cap nuts keep them in place. Tuck the drying rack into a corner until you need to use it again!
NOTE: cPVC is the yellowish pipe meant for hot and cold water plumbing lines.
Note about Washers: The thickness of the washers is important. They are to be used as spacers between the 2 end caps that make up the hub. You may have to try different combinations to make your drying rack rotate without wobbling. Notice the smallest washer is inside the washer with the larger hole. This was because, the thickness of the large washer was too thick and I needed only one more milimeter with the combination of washers I had to make it the right size gap.
- Metric Sizes for the Washers are as follows.
- *1 Washer 25.4mm OD, x 6.35mm ID, 1.5875mm Thick
- **1 Washer 25.4mm OD, x 11.1125mm ID, 2.286mm Thick
- ***1 Washer 9.8mm OD, 5mm ID, 1mm thick
How to Use Your Drying Rack!
- Cut your 50lb test fishing line to the length needed to fit between the arms and base of your drying rack. Add 4" for loops at each end.
- Put a crimp bead on one end. Make a loop about 1" long, or big enough to fit over your cap nuts. Put the end back into the crimp bead and flatten the crimp bead. This is stopper. String on an E-Bead and a mini pony bead. If you are making beads with large holes, you might want to add a regular pony bead as well. String on your beads leaving a 3" tail. Put a pony bead, E-bead and crimp bead at the other end and make the same size loop as before. . The pony beads will take on the extra glaze that drips from the last good beads at each end.
- Holding both ends, dip your beads into your thin varnish or glaze.
- Shake the excess glaze off of the beads.
- Hang one end on the drying rack with the loop.
- When you dip them a second time, invert your strand of beads for even coverage. (Tip: When getting ready to dip them the 2nd, 3rd, 4th and 5th times, remove all of the strands from the rack at the same time. Take the time to break apart the beads that are stuck together and move them down to the pony beads that are now at the bottom.)
- If you do multiple dips, do an even number of dips, inverting your strand each time for even coverage.
- What I use is 4 coats of PC Petrifier Wood hardener and 1 or 2 coats of Vibrance.
- If you want to be able to keep track of your coats, you can make number beads. This pattern is also available on this site.
Design written on Monday December 1, 2014. Copyright ©2014-2019 By Julie A. Bolduc
Sheetworks Studio Version 2.5 — Free Download! - Two New Categories Added, Graph Paper and Quilt Blocks
All items in our online shop ship free within the US only. I currently offer U.S. shipping only and it is from rural Maine. Delivery can vary from 2–14 days depending on your distance from Maine. Expedited shipping is not available.
Please note: I am now selling all of my paper bead making tools and other items from this web site using Paypal payments.
I have removed all of my paper bead making tools from Amazon. My Kindle crochet pattern books and paper template paperback books continue to be available on Amazon, as they are printed and fulfilled directly by Amazon. A limited number of paper bead making tools remain available on Etsy but I am not linking to those tools from this site.
Random Quick Tip!
Sending Crochet HooksIf you need to send crochet hooks in the mail, you could flatten a paper towel tube, cut it so it is 7" long, then tape one end to seal it. I suggest using Fiber Tape for strength. Then put the hooks inside the tube, they should be wrapped in tissue paper, then seal up the other end. Then you can put this protective tube inside a 6"x9" envelope for sending through the mail. This way they should not work themselves out of the envelope. You could even send them in a business size envelope that is made manilla paper. That way it is not sooo big.