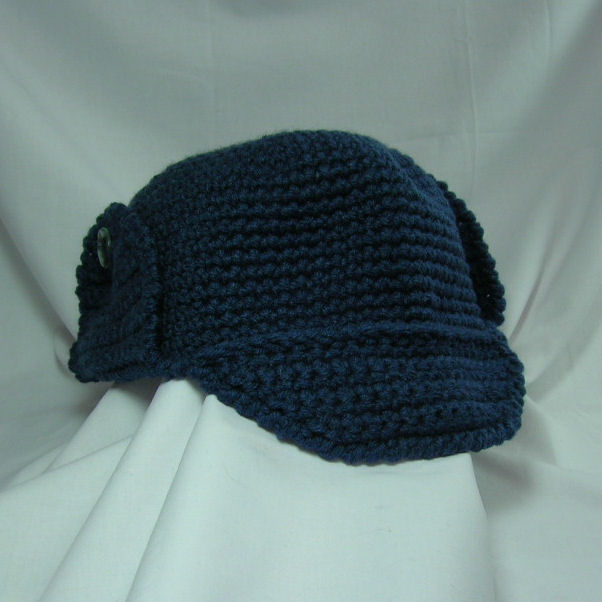
Snowboarder's Hat

Designed by Julie A Bolduc
This free crochet pattern is designed with the snowboarder in mind. The ear flaps can be unbuttoned to protect your ears on very cold days.
Materials Needed
Worsted weight acrylic yarn of desired color. Red Heart Super Saver was used in the example.
Size I/9 or 6mm aluminum crochet hook
2 buttons to match yarn, 5/8" in diameter
Yarn needle for weaving in ends and thin enough to go through the holes in the buttons.
Yarn Thickness: 4mm
Gauge: 4sc=1"
Finished Size: Fits man's head, 21"
Skill Level: Intermediate
Instructions
RND 1: Ch2. 7sc in 2nd ch from hook. Do not join. Use a contrasting color piece of yarn to mark beginnings of rounds.
RND 2: 2sc in each sc around. Place marker. (14sc)
RND 3: *2sc in next sc. Sc in next sc. Rep from * around to marker. Move marker to just in front of the last st just made. Do this at the end of each round. (21sc)
RND 4: *2sc in next sc. Sc in each of the next 2 sc. Rep from * around to marker. Move marker. (28sc)
RND 5: *2sc in next sc. Sc in each of the next 3 sc. Rep from * around to marker. Move marker. (35sc)
RND 6: *2sc in next sc. Sc in each of the next 4 sc. Rep from * around to marker. Move marker. (42sc)
RND 7: *2sc in next sc. Sc in each of the next 5 sc. Rep from * around to marker. Move marker. (49sc)
RND 8: *2sc in next sc. Sc in each of the next 6 sc. Rep from * around to marker. Move marker. (56sc)
RND 9: *2sc in next sc. Sc in each of the next 7 sc. Rep from * around to marker. Move marker. (63sc)
RND 10: *2sc in next sc. Sc in each of the next 9 sc. Rep from * around to marker. Move marker. (70sc)
RND 11: *2sc in next sc. Sc in each of the next 10 sc. Rep from * around to marker. Move marker. (77sc)
RND 12-25: Sc in each sc around moving the marker at the end of each round as you go. At the end of RND 25, fasten off and weave ends into back of work.
Visor
ROW 1: Join yarn on inside of brim on any stitch working on the front post of each sc for this row only. Work 1 sc in same st as joining and in each of the next 23 sts across. Ch1, turn. (24sts)
ROW 2: Sc in each sc across. Ch1, turn. (24sts)
ROW 3: Sk first sc. Sc in each of the next 21 sc. Sk next sc. Sc in last sc. Ch1, turn. (22sc)
ROW 4: Sk first sc. Sc in each of the next 19 sc. Sk next sc. Sc in last sc. Ch1, turn. (20sc)
ROW 5: Sk first sc. Sc in each of the next 17 sc. Sk next sc. Sc in last sc. Ch1, turn. (18sc)
ROW 6: Sk first sc. Sc in each of the next 15 sc. Sk next sc. Sc in last sc. Ch1, turn. (16sc)
ROW 7: Sk first sc. Sc in each of the next 13 sc. Sk next sc. Sc in last sc. Ch1, turn. (14sc)
ROW 8: Sk first sc. Sc in each of the next 11 sc. Sk next sc. Sc in last sc. Fasten off. (12sc)
Ear Flaps
Right Flap
ROW 1: Join yarn in 2nd sc from left side of where the visor is. Ch1, sc in same st as joining. Sc in each of the next 13 sts. Ch1, turn. (14sc)
ROW 2-8: Sc in each sc across. Ch1, turn.
ROW 9: Sk first sc. Sc in each of the next 11 sc. Sk next sc. Sc in last sc. Ch1, turn. (12sc)
ROW 10: Sk first sc. Sc in each of the next 9 sc. Sk next sc. Sc in last sc. Ch1, turn. (10sc)
ROW 11: Sk first sc. Sc in each of the next 3 sc. Ch2. Sk 2 sc. Sc in each of the next 2 sc. Sk next sc. Sc in last sc. Ch1, turn.
ROW 12: Sk first sc. Sc in each of the next 2 sc. 2sc in next ch2 sp. Sc in next sc. Sk next sc. Sc in last sc. Fasten off.
Left Flap
Lay hat down in front of you so that the visor is on the left and the right ear flap is on the bottom. Count 16 sts to the right of the last stitch where the visor is. Join yarn and repeat ROWs 1-12 of the right ear flap. Do not fasten off. Weave all ends into work at this time.
Final Round
Work 1 reverse single crochet in each st around brim of whole hat. Weave ends into work.
Using yarn and the thin yarn needle, sew a button to each side of hat lining up the button holes in the ear flaps with where the buttons should go.
Design written on Saturday, January 06, 2007. Copyright ©2006 By Julie A. Bolduc f124020

