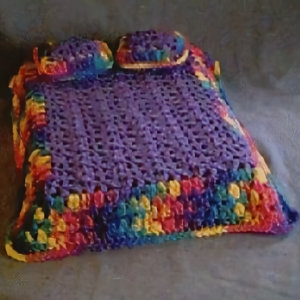
Fashion Doll
Bedspread & Pillows
 Designed By Julie A. Bolduc
This fashion doll beadspread is made to the same scale as the Barbie and Ken Dolls and this spread is meant to be for a Queen size bed. The Lavender part is made just to cover the top of the bed and the varigated colors are meant to hang down the sides of the bed.
Materials Needed:
Color 1= Lavender worsted weight yarn
Star Brights variegated worsted weight yarn
Red Heart Yarn was used in the example.
Size H aluminum hook
Scrap Fabric about ¼ yard
Sewing thread and needle
Stuffing either yarn scraps or polyester fiber fill.
Yarn needle for weaving in ends
Yarn Thickness: 4mm
Gauge: with H hook 4 sc per inch 3 of the pattern rows =2"
Finished Size: Bedspread=15"x18" Pillows=4.5"x4.5" each
Skill Level: Intermediate

Instructions
With Lavender or Color1,
Row 1: Ch 40, Dc in 4th ch from hook. *Skip 2 chs, dc in next st. Sk 2 chs (2dc, ch1, 2dc) in next ch. Rep from * across. Sk 2 chs, dc in next st. Sk 2 chs 2 dc in last ch. Ch3, turn.
Row 2-20: Dc in first dc. Sk next dc, dc in dc, *(2dc, ch1, 2dc) in ch1 sp. Dc in dc. Rep from * across. 2dc in top of ch3. Ch3, turn.
Row 21: *Hdc in dc, ch2, sc in ch1 sp, ch2. Rep from * across. Sc in top of ch3. At the end of the last row, break off and weave ends into work.
Border
Tie on Variegated into the left corner at the very last stitch made with the Lavender. Work 2dc ch2 2dc in each corner sp. and Work 2 dc in each row on each side and across the bottom and top. Then on the next 3 rows, work 2 dc in each sp bet 2dc groups around. work 2dc, ch2, 2dc in each ch2 sp in the corners.
In the last row. Sc in each st around but work 3 sc in each ch 2 sp in each corner. Fasten off and weave ends into work.
Pillows
Make 2 for each pillow.
With Lavender
ROW 1: Ch 14, dc in 5th ch from hook. *Sk 2 sts, (2dc, ch1, 2dc) in next st. Sk 2 sts, dc in next st. Rep from * one more time to the end but dc in top of ch5. Ch3, turn.
Row 2: *(2dc, ch1, 2dc) in ch1 sp. Dc in dc. Rep from * one more time to the end but dc in top of ch3. Ch 5 turn.
Row 3: Sc in ch1 sp. Ch2, hdc in dc, ch2 sc in ch1 sp, ch2, hdc in top of ch5. Fasten off Lavender.
Border:
First Corner & Left Side:
Tie on Starbrights in large 5ch sp at the end of row 3. Work the fol in this sp. (Ch3, dc, ch2, 2 dc). Work 2dc in next row down the left side.
Second Corner: Work the fol in next corner sp. (2dc, ch2, 2dc).
Bottom side: Work a total of four 2dc groups across the bottom working in the spaces and in the stitches where the shells are worked.
Third Corner & right side: When you get to the corner again. Work (2dc, ch2, 2dc) then work 2dc up in the next row on the right side.
Fourth Corner: Yes follow this carefully it is right. (2dc, ch2, 2dc, 2dc).
Top: Work 2dc in each of the next 2 ch2 sps. Work 2dc in ch sp that you put the first shell in then join with a slst in top of ch3. Fasten off. Weave ends into work before crocheting them together.
Assembly:
Pillow insert:
Cut 2 pieces of scrap cloth 4¼"x 3.5" for each pillow and sew right sides together either by hand or by machine around 3 sides using a ¼" seam allowance. Stuff and finish sewing to close. See picture to see what they should look like.
Pillow covers:
With wrong sides facing each other, Single crochet two pieces together working 3 sc in each ch2 sp. Work around 3 sides, insert pillow form and finish sc across fourth side to close. Slst in first sc to join. Fasten off and weave ends into work. Repeat with other pillow.
Designed in November 1998 Copyright © 1998 By Julie A. Bolduc p113010

