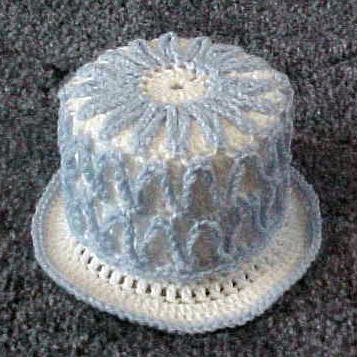
Frosted Bath Tissue Cover

Designed by Julie A Bolduc
This bath tissue cover looks like a frosted cake. First the base of white is made then the blue is added over it. It is a fun project to make and would look great done with any combination of colors to match your bath's decor.
Materials Needed
4oz white worsted weight acrylic yarn. Red Heart Super Saver was used in the example.
1 1/2 oz baby blue worsted weight acrylic yarn. Red Heart Super Saver was used in the example.
Size H aluminum crochet hook
Yarn Thickness: 4mm
Gauge: 4sc=1"
Finished Size: 6"D x 5"H
Skill Level: Intermediate
Instructions
RND 1: With white. Ch6, join w/slst to first ch to form ring. Ch3, 15 dc in ring. Join w/slst to top of ch3.
RND 2: Ch3. In back lp only on this round, dc in same st as slst st. 2dc in each st around. Join w/slst to top of ch3.
RND 3: Ch3. 2dc in next st. *Dc in next st. 2dc in next st. Rep from * around. Join w/slst to top of ch3.
RND 4: Ch3. Dc in same st as slst. Dc in each of the next 2 sts. *2dc in next st. Dc in each of the next 2 sts. Rep from * around. Join w/slst to top of ch3.
RND 5: Ch3. In back lp only on this round. Dc in each st around. Join w/slst to top of ch3.
RND 6 & 7: Ch3. Dc in each st around. Join w/slst to top of ch3.
RND 8-10: Rep rnds 5, 6 & 7.
RND 11-12: Rep rnd 5 & 6.
RND 13: Ch3 Dc in same st as slst. 2dc in each st around. Join w/slst to top of ch3. Fasten off white.
With blue
RND 1 of outside decoration: Join yarn onto front lp of rnd 1(at the slst). Ch6, Sc in 2nd front lp of rnd 4 right after the slst on that round. Ch6. *Sc in next front lp of rnd 1. Ch6. Sk next 2 front lps of rnd 4. Sc in next front lp. Ch6. Rep from * around. Join w/slst to same st as joining. Join w/slst to first ch of the first ch6. Fasten off. Weave ends in.
RND 2: Join to first free front lp on rnd 4. Ch1. Sc in next front lp. Ch6. Sc in next front lp of rnd 7. (trace the sts down in the same column then sc in the next st. ) Ch6. *Sc in next free front lp of rnd 4. Sc in next free front lp. Ch6. Sk 2 front lps on rnd 7 then sc in next front lp. Ch6. Rep from * around. Join w/slst to ch1. Fasten off. Weave ends in.
RND 3: Join to first free front lp on rnd 7. Ch1. Sc in next front lp. Ch6. Sc in next front lp of rnd 10. (trace the sts down in the same column then sc in the next st. ) Ch6. *Sc in next free front lp of rnd 7. Sc in next free front lp. Ch6. Sk 2 front lps on rnd 10 then sc in next front lp. Ch6. Rep from * around. Join w/slst to ch1. Weave ends in.
RND 4: Join to first free front lp on rnd 10. Ch1. Sc in next free front lp. Ch3. *Sc in each of the next 2 free front lps of same rnd. Ch3. Rep from * around. Join w/slst to ch1. Fasten off. Weave ends in.
Last rnd: Join blue to rnd 13. Ch1. Sc in each st around. Join w/slst to ch1. Fasten off Weave all ends into inside of work.
Design written on Wednesday, November 20, 2002. Copyright ©2002 By Julie A. Bolduc p122004

