
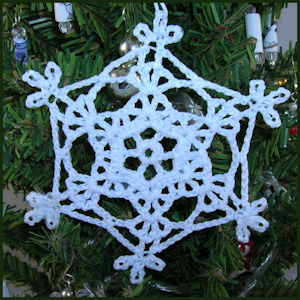
Sugarloaf Snowflake
 Designed By Julie A. Bolduc
This snowflake is named after Sugarloaf Mountain in Maine. The snowflake is fast and easy to make and would make a great addition to anyone's snowflake collection.
Materials Needed
Size 10 Crochet Cotton in white. Aunt Lydia's Classic Crochet Cotton was used in the example
Size 7 Steel crochet Hook
Tapestry Needle to weave in ends
Your favorite stiffening fluid
Piece of form board
Rust proof Pins
Waxed Paper
Small margarine tub or other small bowl or paper cup.
Ornament Hanger of choice.
Yarn Thickness: 10thread
Gauge: 8sc=1"
Finished Size: 3½" from point to point
Skill Level: Beginner to Intermediate
Instructions
RND 1: Ch6. Join w/slst to first ch to form ring. Ch5. Dc in ring, ch2, 5 times. Join w/slst to 3rd ch of ch5.
RND 2: Ch1. (2sc, ch2, 2sc in next ch2 sp.) *Sc in next dc. Rep bet () once. Rep from * around. Join w/slst to ch1.
RND 3: Ch3. (Dc, ch2, dc, ch2, dc, ch2, dc in next ch2 sp. Sk next 2 sc.) *Dc in next sc. Rep bet () once. Rep from * around. Join w/slst to top of ch3.
RND 4: Slst in each of the next 4 sts and into the next ch2 sp. Ch5, dc, ch2, dc, ch2, dc in same ch2 sp. Ch5. Sk each of the next 2 ch2 sps. *Dc, ch2, dc, ch2, dc, ch2, dc in next ch2 sp. Ch5. Sk each of the next 2 ch2 sps. Rep from * around. Join w/slst to 3rd ch of ch5.
RND 5: Slst in each of the next 2 chs. Sc in next dc. Ch9. Slst in 6th ch from hook. Ch6, slst in 6th ch from hook, twice. Slst in same ch as 4d ch of ch9. (Dc in next dc. Ch5. Sc in next ch5 sp. Ch5. Sk next dc.) *Dc in next dc. Ch6, slst in 6th ch from hook 3 times. Slst in same ch as first slst of the 3 lps you just made. Rep bet () once. Rep from * around. Join w/slst to 3rd ch of ch9. Fasten off and weave ends into back of work.
To Stiffen Snowflake
Step 1: Cut a piece of waxed paper and pin it to the surface of your foam board around the edges to keep it in place. Set aside for now.
Step 2: Pour about 2 tablespoons stiffening fluid into cup or bowl. Dip snowflake into fluid and soak until completely drenched. Squeeze out excess with an absorbent paper towel or cloth
Step 3: Lay snowflake flat onto wax paper covered board and pin into place, shaping as desired. Be sure to pin all the points also. Pin it so it is exactly as you want it.
Step 4: Allow to dry overnight.
Step 5:Remove pins from snowflake when completely dry. Remove snowflake from waxed paper. Attach hanger to one of the points and enjoy!
Design written on Saturday, August 07, 2010. Copyright ©2010 By Julie A. Bolduc p103049
Sheetworks Studio Version 2.5 — Free Download! - Two New Categories Added, Graph Paper and Quilt Blocks
All items in our online shop ship free within the US only. I currently offer U.S. shipping only and it is from rural Maine. Delivery can vary from 2–14 days depending on your distance from Maine. Expedited shipping is not available.
Please note: I am now selling all of my paper bead making tools and other items from this web site using Paypal payments.
I have removed all of my paper bead making tools from Amazon. My Kindle crochet pattern books and paper template paperback books continue to be available on Amazon, as they are printed and fulfilled directly by Amazon. A limited number of paper bead making tools remain available on Etsy but I am not linking to those tools from this site.
Random Quick Tip!
Ok to Download Bead Sheet ImagesI give you permission to download and use the images in either bead sheet generating program on the site, to your computer, for use in any software you may have on your computer to do with as you please. Just do not sell the images as they are. Use them in any project, then feel free to sell your finished projects. I would appreciate mentioning the website where you got the image for your project however, but it is not mandatory.