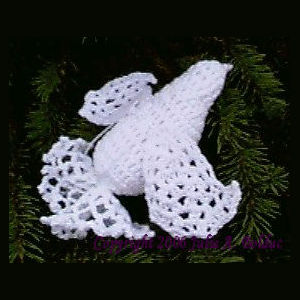
Wedding Dove Ornament
 Designed By Julie A. Bolduc
This dove ornament would be the perfect decoration on a wedding table and would make a nice first Christmas ornament for a new couple's first Christmas tree together.
Materials Needed:
White crochet cotton size 10.
Polyester Fiber Fill
Size 7 steel crochet hook
Tapestry needle for weaving in ends
Thread Thickness: 10thread
Gauge: 9 dc =1"
Finished Size: =4½" from tip of beak to tip of tail
Skill Level: Intermediate
Instructions
Head
RND 1: Ch5, slst in firs ch from hook and in next ch. sc in next ch and work 12 dc in last ch. Join w/slst in first dc. Beak and front of face made.
RND 2+3: Ch3, work 1 dc in each st around. Join w/slst to top of ch3.
RND 4: Ch3, dc in same st as slst. 2dc in next dc. Dc in each of the next 9 dc. 2 dc in last dc. Join w/slst in top of ch3.
RND 5: Ch3, dc in same st as slst. 2 dc in each of the next 3 dc. Dec over the next 4 dc. (*yo, insert hook, pull up a lp, pull lp through 2 lps on hook and rep from in next st then yo and draw thread through all 3 lps left on hook. ) Do this twice. Dc in next dc. 2 dc in last 3 dc. Join w/slst to top of ch3.
RND 6: Ch3, dc in same st as slst. 2 dc in each of the next 3 dc. Dc in next 12 dc. 2 dc in each of the last 3 dc. Join w/slst to top of ch3.
RND 7: Ch3, dc in same st as slst. 2 dc in each of the next 5 dc. Dc in each of the last 20 dc. Join w/slst to top of ch3.
RND 8-13: Ch3, dc in next st and in each st around. Join w/slst to top of ch3.
RND 14: Ch3, (*yo, insert hook, pull up a lp, pull lp through 2 lps on hook and rep from in next st then yo and draw thread through all 3 lps left on hook. ) Do this all the way around. Stuff body of dove.
RND 15: Rep RND 14.
Tail
RND 16: Ch 3, sc in next st. Rep from beg around. Join w/slst to first ch of ch3.
RND 17: Slst to the 2nd ch of the first ch3 lp. Sc in same ch3 lp. *Ch3, sc in next ch3 lp, ch3, sc in same ch3 lp, ch3. Rep from * around. Join w/slst in 1st sc.
RND 18: Slst to the to the 2nd ch of the first ch3 lp. Sc in same ch3 lp. Ch3, * sc in next ch3 lp. Ch3. Rep from * around. Join w/slst to first sc.
RND 19: Slst to the to the 2nd ch of the first ch3 lp. Sc in same ch3 lp. Ch5, * sc in next ch3 lp. Ch5. Rep from * around. Join w/slst to first sc.
RND 20+21: Slst to the to the 3rd ch of the first ch5 lp. Sc in same ch5 lp. Ch5, * sc in next ch5 lp. Ch5. Rep from * around. Join w/slst to first sc.
RND 22: Slst to the 3rd ch of the first ch5 lp. Sc in same ch 5 lp. *Ch5, slst in 5th ch from hook, sc in ch5 lp. Ch 7, slst in 5th ch from hook, ch2, sc in next ch5 lp. Rep from * around. Join w/slst to first sc. Fasten off.
Wings Make 2.
You will be working in rows with the wings but you will be starting out in a different manner. You will start with a shell and work on the bottom side of it instead of the top.
ROW 1: Ch3, work 6dc in 3rd ch from hook. Ch3, dc in 3rd ch from hook. Now work the fol in the very first ch in project on the bottom center of the shell. (2dc, ch2, 2dc). Now work 2dc in top of first dc made in shell. Ch3, turn.
ROW 2: Dc in dc, Work the fol in the ch2 sp. (2dc, ch2, 2dc, ch2, 2dc). 1 dc in each of the last 2 dc. Ch3, turn.
ROW3-5: Dc in dc, work the fol in the next two ch2 sps. (2dc, ch2, 2dc). Dc in each of the last 2 dc. Ch3, turn.
ROW 6: Repeat ROW 3 but do not (ch3turn). Just turn without making a ch.
ROW 7: Slst to the first ch2 sp. Slst in the ch2 sp, ch3, dc in same ch2 sp. Dc in sp bet shells, work the fol in next ch2 sp. (2dc, ch2, 2dc). 2 dc in sp bet shell and last 2 dc. Ch2, Work the fol bet last two dc. (2dc, ch2, 2dc). Fasten off. Weave ends into work.
Assembly
Sew the wings onto the body working the stitches around the starting shell from one side to the other. Position the wings at an angle so the very last shell worked is facing the front of the dove. This give the illusion of "finger tips". Check picture to see what I mean.
Designed in June, 1998 by Julie A. Bolduc Copyright © 1998 by Julie A. Bolduc p103003

