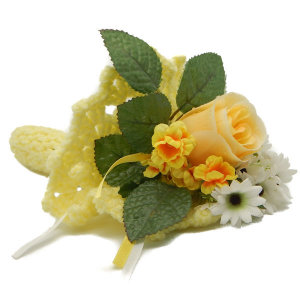
Bride's Maid Bouquet Holder
 Designed by Julie A. Bolduc
This crochet pattern is for that wedding where even the bride's maids carry flowers. This holder is made with a bone ring for stability where the flower's stems go through and this patterns is really fast and easy to make.
Materials Needed
Worsted weight acrylic yarn in color of choice according to colors at wedding.
Size G/6 or 4mm aluminum crochet hook
.75" plastic bone ring
Silk flowers with leaves on stems
Floral tape
15" of .25" wide satin ribbon
Tapestry needle for weaving in ends
Yarn Thickness: 4mm
Gauge: 5dc=1"
Finished Size: 7" by 5"
Skill Level: Beginner to intermediate
Instructions
Handle
RND 1: Join yarn onto plastic ring. Ch1. Work 16 sc in ring. Join w/slst to first sc.
RND 2: Ch3. Working in back lps only on this round only, dc in each st around. Join w/slst to top of ch3.
RND 3-9: Ch3. Dc in each dc around. Join w/slst to top of ch3. At the end of RND 9, fasten off and weave ends into work.
Collar
Join yarn in front loop of RND 1 where you joined inserting hook from front to back of front loop.
RND 1: Ch3, dc in same st as joining. Ch2. Sk 1 st. *2dc in next st. Ch2. Sk next st. Rep from * around. Join w/slst to top of ch3.
RND 2: Slst into the next dc and into the next ch2 sp. Ch3, dc, ch2, 2dc in same sp. Ch1. *2dc, ch2, 2dc in next ch2 sp. Ch1. Rep from * around. Join w/slst to top of ch3.
RND 3: Slst into the next dc and into the next ch2 sp. Ch3, dc, ch2, 2dc, ch2, 2dc in same sp. Sc in next ch1 sp. *2dc, ch2, 2dc, ch2, 2dc in next ch2 sp. Sc in next ch1 sp. Rep from * around. Join w/slst top of ch3.
RND 4: Slst into the next dc and into the next ch2 sp. Ch3, dc, ch2, 2dc in same sp. 2dc, ch2, dc in next ch2 sp. Ch1. *2dc, ch2, 2dc in each of the next 2 ch2 sps. Ch1. Rep from * around. Join w/slst to top of ch3.
RND 5: Ch1. Sc in next dc. Sc, picot, sc in next ch2 sp. Sc in each of the next 2 dc. *Sc in each of the next 2 dc. Sc, picot, sc in next ch2 sp. Sc in each of the next 2 dc. Rep from * around. Join w/slst to ch1. Fasten off and weave ends into back of work.
The bouquet holder is now done.Flowers
STEP1: Cut stems to about 4" - 5" long to fit inside handle.
STEP 2: Wrap stems all toghether with floral tape to make one stem.
STEP 3: Tie ribbons onto base of flowers. You may want longer ribbons for a more dramatic effect.
STEP 4: Place stem of flowers into handle of bouquet holder.
NOTE: You may want to use real flowers for this and the little vial that comes with single flowers should fit through the ring.
Design written on Saturday, January 06, 2007. Copyright ©2007 By Julie A. Bolduc p114092

