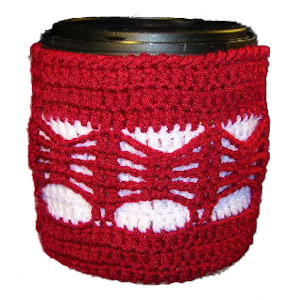
Coffee Can Cover
 Designed By Julie A. Bolduc
Use this cover to cover up the current plastic container of coffee you are using and then when it is empty, you can use the container to keep a plant in. You could make this pattern in Christmas or any other holiday color. This makes those large plastic containers that a certain brand of Coffee comes in really great to use for storing all sorts of items.
Materials Needed
Worsted weight acrylic yarn in 2 colors. Or a total of about 3oz. Red
Heart Super Saver was used in the example.
Size H/8 aluminum crochet hook
Yarn needle for weaving in ends
Large Plastic Coffee Can
Yarn Thickness: 4mm
Gauge: 4dc = 1"
Finished Size: fits large coffee can 8" diam
Skill Level: Beginner to Intermediate
Instructions
RND 1: With Main color: Ch6. Join w/slst to first ch to form ring. Ch3, 15dc in ring. Join w/slst to top of ch3. (16dc)
RND 2: Ch3, dc in same st as slst. 2dc in each dc around. Join w/slst to top of ch3. (32dc)
RND 3: Ch3, dc in same st as slst. Dc in next dc. *2dc in next dc. Dc in next dc. Rep from * around. Join w/slst to top of ch3. (48dc)
RND 4: Ch3, dc in same st as slst. Dc in each of the next 2 dc. *2dc in next dc. Dc in each of the next 2 dc. Rep from * around. Join w/slst to top of ch3. (64dc)
RND 5: Ch1. Sc in each dc around. Join w/slst to ch1.
RND 6-8: Ch3. Dc in each st around. Join w/slst to top of ch3. At the end of RND 8, fasten off maroon.
RND 9: Join white in same st as slst but to back loop only. Work in the back loops on this round only. Ch3. Dc in each dc around. Join w/slst to top of ch3.
RND 10-13: Ch3. Dc in each dc around. Join w/slst to top of ch3. Fasten off white.
Now you will be working back on the front loops of round 9 and this section will be referred to as RND 9F, 10F, 11F, 12F & 13F.
RND 9F: Join maroon on front loop of same st as slst. Ch3. Dc in next front loop. Ch6. Sk 6 front loops. *Dc in each of the next 2 front loops. Ch6. Sk 6 front loops. Rep from * around. Join w/slst to top of ch3.
RND 10F: Ch3. Dc in next dc. Ch3. 2sc in next ch6 sp. Ch3. *Dc in each of the next 2 dc. Ch3. 2sc in next ch6 sp. Ch3. Rep from * around. Join w/slst to top of ch3.
RND 11F - 13F: Ch3. Dc in next dc. Ch3. Sc in each of the next 2 sc. Ch3. *Dc in each of the next 2 dc. Ch3. Sc in each of the next 2 sc. Ch3. Rep from * around. Join w/slst to top of ch3.
Now you will work on both the front and back layers on this next round.
RND 14: Insert hook in top of ch3 of RND 13 and pull up a loop through both layers. Ch3. Dc in next dc through both layers. Dc in each of the next 6 dc. *Dc in each of the next 2 dc through both layers. Dc in each of the next 6 dc. Rep from * around. Join w/slst to top of ch3.
RND 15 & 16: Ch3. Dc in each dc around. Join w/slst to top of ch3.
RND 17: Ch1. Work 1 reverse sc in each st around. Join w/slst to first reverse sc. Fasten off and weave all ends into back of work.
You can either place it over a can of coffee to hide it or you can put the coffee can in it with the lid exposed for convenience. You could also put a potted plant inside an empty coffee can for a decorative planter.
Design written on Wednesday, August 23, 2006. Copyright ©2006 By Julie A. Bolduc f114022

