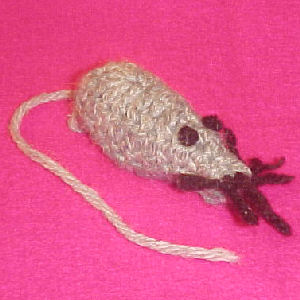
Cat Nip Mouse
 Designed By Julie A. Bolduc
This mouse is really fast and easy to make and you could make several in an evening. And if you use a good quality cat nip, your cats will go nuts for it. Mine are right now while I type up these instructions. I give you permission to make and sell this mouse in your local craft fair if you like. Just make sure you provide a link to my site on the tag that goes with it.
Materials Needed:
Worsted weight acrylic yarn in gray or what ever color you want your mouse.
Scrap piece of black acrylic worsted weight yarn about 12" long
Tiny amount polyester fiberfill
Good quality dry cat nip about 1tbsp or enough to stuff mouse with fiberfill
Size G/6 or 4.5mm aluminum crochet hook
Yarn needed for weaving in ends and stitching bottom closed
Yarn Thickness: 4mm
Gauge: 4dc = 1"
Finished Size: 3"L x 1.5" W
Skill Level: Beginner
Instructions
RND 1: Ch11. 7dc in 3rd ch from hook. Dc in each of the next 3 chs. Hdc in each of the next 3 chs. Sc in next ch. 4sc in last ch to go around corner to the other side of the chain. Sc in next ch. Hdc in each of the next 3 sts. Dc in each of the next 3 sts. Join w/slst to top of ch3.
RND 2 & 3: Ch3. Dc in each of the next 10 dc. Hdc in each of the next 3 hdc. Sc in each of the next 6 sc. Hdc in each of the next 3 hdc. Dc in each of the next 3 dc. Join w/slst to top of ch3. Fasten off leaving then finishing end about 18" long. You will use this to stitch the bottom close.
Finishing : Stuff mouse with cat nip and fiberfill about 50/50 of each. Use whip stitch to sew bottom closed using the 18" end. Weave rest of end in and trim close to body.
With black yarn, use a french knot for each eye and the nose. Then add the whiskers.
Design written on Tuesday, July 12, 2005. Copyright ©2005 By Julie A. Bolduc f114005

