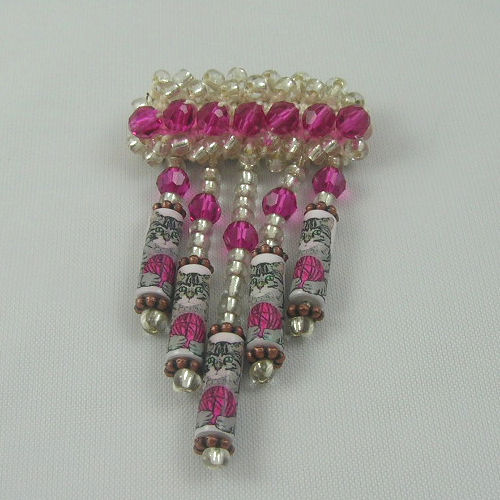
Crystal Beaded Brooch

Designed By Julie A. Bolduc
This brooch is really crocheted but you cannot see the stitches. The top part is crocheted with beads in it, then the fringe is made last. It is a fun and somewhat challenging piece of jewelry to make but very rewarding. Of course, you can substitute any beads you like as long as the sizes are the same.
Materials Needed:
Size 10 crochet cotton in ecru or white.
Size 7 steel crochet hook
61 silver lined clear E Beads or size 6 seed beads.
12 - 6mm faceted round crystals in color of choice.*
10 - 6mm flat spacers. Antiqued Copper Rondelles with dots
5 Paper Beads, Gray Kitty with pink ball of yarn. 6mm x 12mm with a 1/16" hole**
1 bar pin, 1" long
A piece of thin leather, ½"x1½" rectangle
Fine tapestry needle, thin enough to fit through crystals
1/8" paper punch
Yarn Thickness: 10thread
Gauge: 8sc=1"
Finished Size: 1½"x 3"
Skill Level: Intermediate to advanced
Instructions
String 15 E beads, 7 crystals and 15 ebeads onto crochet cotton.
ROW 1: Ch 15. Work a beaded sc in each chain across. Ch1, turn.
ROW 2: Sc in each st across. Ch1, turn.
ROW 3: Your next bead should be an Ebead. Work a beaded sc in each of the first 2 stitches. *Sc in next st. Beaded Sc in next st. Repeat from * 6 times more. Your last bead should be in the very last sc. Work one more beaded sc in this very last stitch. It should be an E Bead. Ch1, turn.
ROW 4: Skip the very first st. Sc in each st across. Ch1, turn.
ROW 5: Beaded sc in each st across. Fasten off leaving a 48" length of crochet cotton for finishing. Set work aside for now.
Finishing:
Step 1: Punch a hole at each end of leather closer to one long side of the leather. You may need to make the holes slightly bigger than just one punch. Make them far enough apart for the pin to fit through. The edge where the holes are closer, is to be the top of the pin. The holes need to be centered lengthwise but not width wise.
Step 2: Put the pin through the holes so the bar itself is on one side and the pin part is on the other. Stitch the leather to the back of the crochet work so the pin is on the outside. Use an overcast stitch to stitch the leather to the back of the crochet work. Do not cut the thread. Make sure you end up at the bottom right hand side of the back of the pin. This is where you will make the strands of the fringe.
Step 3: Make each strand of fringe in the following way. Bring the thread through each bead in the order indicated for each strand but when you get to the last ebead at the end of each strand, work the thread around the last bead then back through each bead on the strand. Secure the top of each strand to the back of the pin by weaving the thread through a couple of stitches along the bottom edge of the whip stitches on the leather. Make sure to evenly space the 5 strands across the bottom of the main part of the brooch. Then when you are done with the 5 strands, weave about 1" of the cotton into the back of work on the upper part of the brooch and trim close to work.
Strand 1: 1 Ebead, 1 crystal, 1 ebead, 1 spacer, 1 paper bead, 1spacer, 1 ebead.
Strand 2: 3 Ebeads, 1 crystal, 3 ebeads, 1 spacer, 1 paper bead, 1 spacer, 1 ebead.
Strand 3: 5 Ebeads, 1 crystal, 5 ebeads, 1 spacer, 1 paper bead, 1 spacer, 1 ebead.
Strand 4: 3 Ebeads, 1 crystal, 3 ebeads, 1 spacer, 1 paper bead, 1 spacer, 1 ebead.
Strand 5: 1 Ebead, 1 crystal, 1 ebead, 1 spacer, 1 paper bead, 1spacer, 1 ebead.
I bought most of my beads from Fire Mountain Gems. The crystals are genuine Swarovski crystals in Fushia.
The paper beads are of my design. I am going to make them available in the store for $3.50 for a pack of 10 beads.
Design written on Wednesday, June 25, 2008. Copyright ©2008 By Julie A. Bolduc p107036

