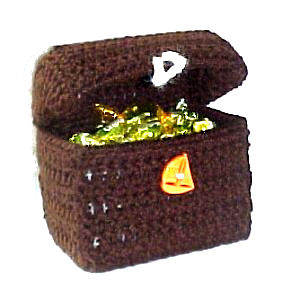
Dad's Treasure Chest
 Designed By Julie A. Bolduc
This treasure chest is perfect for Dad to put his pocket change in at the end of the day! Give it to him filled with gold wrap candies!
Materials Needed
Worsted weight acrylic yarn in Coffee Brown. Red Heart was used in the example
2 3" circles plastic canvas cut in half
3 pieces 7count plastic canvas 30x20 holes
2 pieces 7count plastic canvas 20x20 holes
1 piece 7count plastic canvas 30 by 30 holes
Size H/8 aluminum crochet hook
Yarn needle for stitching pieces together and for weaving in ends
Novelty button ¾"
Yarn Thickness: 4mm
Gauge: 4sc=1"
Finished Size: 5"x3½"x5"
Skill Level: Advanced
Instructions
RND 1: Lid Ends: Make 2 the same. With brown. Ch5. Join w/slst to first ch to form ring. Ch3. 14 dc in ring. Join w/slst to top of ch3.
RND 2: Ch3. Dc in same st as slst. 2dc in each st around. Join w/slst to top of ch3.
RND 3: Ch1. Sc in each st around. Join w/slst to ch1. Fasten off. Weave starting end into back of work. Set both aside until assembly
ROW 1: Lid top: Make 2 the same. Ch16. Sc in 2nd ch from hook and in each ch across. Ch3, turn
ROW 2: Sk very first st. Dc in each st across. Ch1, turn
ROW 3: Sc in each st across. Ch3, turn
ROW 4-11: Rep row 2& 3. Fasten off, weave ends into back of work
ROW 1: Sides: Make 4 the same. Ch11. Sc in each ch across. Ch3, turn
ROW 2: Sk very first sc. Dc in each sc across. Ch1, turn
ROW 3: Sc in each st across. Ch3, turn
ROW 4-7: Rep row 2-3. At the end of row 7, instead of ch3, turn, Fasten off and weave ends into back of work
ROW 1: Front, Bottom and back pieces. Make 6 the same. Ch16. Sc in 2nd ch from hook and in each ch across. Ch3, turn
ROW 2: Sk very first sc. Dc in each sc across. Ch1. Turn
ROW 3: Sc in each st across. Ch3, turn
ROW 4-7: Rep rows 2 & 3. At the end of row 7, fasten off. Weave ends into back of work.
Finishing Assembly: Lid:Sandwich the 30 x 30 holes pieces between the 2 largest crocheted pieces. Make sure the rows are all going in the same direction. (Use a whip stitch.) Stitch one side only workting through all 3 layers on the row 11 side.
Finishing Lid Sides: Put each half circle inside each crocheted circle. Stitch the ends to the lid top as shown in the picture. Work through all thicknesses. (Use a whip stitch.) Leave the 1 long end of the top unworked to stitch to the back of the box later. Set lid aside.
Finishing Plastic Canvas Box: Stitch all plastic pieces together. Stitch the 3 long pieces together along the long edges. Stitch the small pieces on either side of the center long piece. You should now have a cross. Stitch the sides together so you have a box. Set aside.
Finishing Outside and inside crcocheted pieces. : Make 2 the same. Do the same as you did for the plastic pieces. But working with the crocheted pieces instead. Make sure all of the rows of the large pieces are all going in the same direction. Make sure the small pieces' rows are going perpendicular to the direction of the larger pieces so that when you fold it up, they are horizontal. When you are done, you should have 2 crocheted boxes that look the same as the plastic box.
Finishing Putting it all together.: Tuck one of the crocheted boxes inside the plastic canvas box. Tuck the crochet lined box into the other crochet box. Whip stitch through all 3 layers around 3 sides of the top leaving 1 long side unworked. Before you attach the lid, tack the 3 layers of the box together at the joints. Use what ever method works for you.
Finishing Attach Lid: Stitch the unworked plastic canvas pieces togther to form a hinge. (The box to the lid.) Stitch the crochet parts closed.
Finishing Loop & Button: With a scrap of cream colored worsted weigh yarn and the same hook, make a chain 20 chs long. Sew to front of lid in the center. Sew button to front of box so that you can pull the loop over the button to close.
Finishing Giving As Gift: Stuff with gold wrapped candies and give as a gift to your DAD!!
Design written on Tuesday, May 18, 2004. Copyright ©2004-2007 By Julie A. Bolduc p116009

