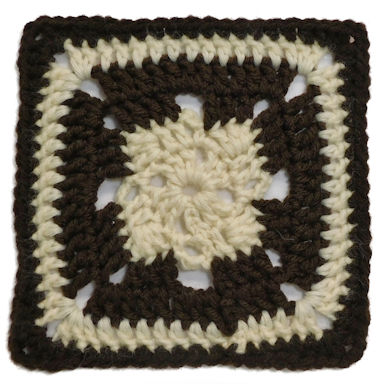
Crooked Center Granny Square

Designed by Julie A. Bolduc
This granny square has a crooked center but then it behaves and straightens out toward the end. It is fast and fun to make and can easily be made with all 1 color. This square was updated on June 15, 2021. A round was added to make it actually 6" x 6" and straighter on each side.
Materials Needed
Worsted weight acrylic yarn in cream and coffee brown
Size H/8 aluminum crochet hook
Yarn needle for weaving in ends
Yarn Thickness: 4mm
Gauge: 4dc = 1"
Finished Size: 6" x 6"
Skill Level: Beginner
Instructions
RND 1: With cream. Ch8. Join w/slst to first ch to form ring. Ch3, 2dc in ring. Ch2. *3dc in ring. ch2. Rep from * 2 times more. Join w/slst to top of ch3.
RND 2: Ch3. Dc in each of the next 2 dc. (3dc around post of last dc made. Sc in next ch2 corner sp. Ch3.) *Dc in each of the next 3 dc. Rep bet () once. Rep from * around. Join w/slst to top of ch3. Fasten off cream.
RND 3: Join brown in same st as slst. Ch3. Dc in each of the next 3 sts. (Ch2. Dc in each of the next 3 sts. Ch3. Sk next ch3 sp.) *Dc in each of the next 4 sts. Rep bet () once. Rep from * around. Join w/slst to top of ch3.
RND 4: Ch3. Dc in each of the next 3dc. (Ch2. 2dc in ch2 sp. Dc in each of the next 3 dc. 3dc in ch3 sp. ) *Dc in each of the next 4 dc. Rep bet () once. Rep from * around. Join w/slst to top of ch3.
RND 5: Join cream in same st as slst. Ch3. Dc in each of the next 3dc. (2dc, ch2, 2dc in ch2 sp. dc in each of the next 8 dc.) *Dc in each of the next 4 dc. Rep bet () once. Rep from * around. Join w/slst to top of ch3. Fasten off color 1.
RND 6: Join color 2 in same st as slst. Ch1. Sc in each of the next 3 dc. (Hdc in each of the next 2 dc. 2hdc, ch2, 2hdc in next ch2 corner sp. Hdc in each of the next 2 dc. Sc in each of the next 8dc.) *Sc in each of the next 4 dc. Rep bet () once. Rep from * around. Join w/slst to ch1. Fasten off color 2. Weave ends into back of work.
Design written on Wednesday, May 19, 2004. Updated on June 15, 2021 Copyright ©2004-2021 By Julie A. Bolduc p101029

