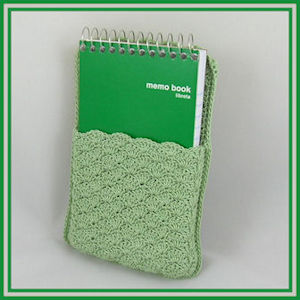
Shell Stitch Fridge Pocket
 Designed by Julie A. Bolduc
This fridge pocket is just the right size for a 3in x 5in pad of paper or index cards. It is made in 3 pieces. The short front side is stitched to one of the back pieces, then the final back piece is added last leaving the top open to insert the plastic stabilizer. Then the top is stitched together to close it. I know the pocket looks small and it was meant to hold a 3"x5" pad of paper but if you want to make it bigger, you can use size 8 thread and a size 5 steel crochet hook to make it bigger.
- Materials Needed
- Size 10 crochet cotton Aunt Lydia's Classic Crochet in Frosty Green
- 1 piece sheet plastic 2.75" x 4.75"
- Size 7 steel crochet hook
- Tapestry Needle to weave in ends
- Yarn Thickness: 10 thread
- Gauge: 8sc = 1"
- Finished Size: 3.25" x 5.25"
- Skill Level: Intermediate
Short Front Panel
ROW 1: Ch32. Sc in 2nd ch from hook and in each ch across. Ch1, turn
ROW 2: Sc in first ch. *Sk 2sc. 5dc in next ch. Sk 2 sc. Sc in next sc. Rep from * across. Ch3, turn.
ROW 3: 2dc in first sc. *Sk 2 dc. Sc in next dc. Sk 2 dc. 5dc in next sc. Rep from * 4 times. Sk 2 dc. Sc in next dc. Sk 2dc. 3dc in last sc. Ch1, turn.
ROW 4: Sc in first dc. Sk 2 dc. 5dc in next sc. Sk 2 dc. *Sc in next dc. Sk 2 dc. 5dc in next sc. Sk 2 dc. Rep from * 3 times more. Sc in top of ch3. Ch3, turn.
ROW 5-16: Rep ROWs 3 & 4 consecutively.
ROW 17: Rep ROW 3. Do not fasten off. Ch3.
Perimeter. Now you are going to work around the perimeter from the upper left side to the upper right side. Not all the way around. Work 2 dc around post of the last dc worked. Work 3 dc in each dc row down left side. Make sure to end with 3 dc in row 2 of front panel. Then work 2sc around post of last dc just made to turn corner. Work 1 sc in each st across the starting chain to the next corner. Ch3 work 2 dc in the first ch3 space of the first shell row up the right side, then work 3 dc in each ch3 space of each shell row up the right side to the top right corner. Slst in top of ch3 of last row. Fasten off. Front and back panels of back side of pocket. Make 2 the same. Repeat as for front short panel but work until you have 27 rows. Work the perimeter the same on both as for short front panel Fasten off and weave all ends into back of work.
AssemblyYou should now have 3 parts. To larger parts that will be for the back. One smaller part that is for the front. Step 1: Lay one large part in front of you, right side facing you with the short ends on the top and bottom. Row 1 should be closest to you.
Step 2: Lay the small part, right side facing up and row 1 on the bottom, on this larger part, lining up the bottom edges of both pieces together and make sure to line up the 3dc sections on the sides. There should be 9 sections.
Step 3: Insert hook in the top left corner stitch of the small part and through the matching stitch on the back part. This is where you will start to stitch from this point to the other top corner of the small part. Join thread, ch1, sc in each st around working 3 sc in each corner, to the top right corner of the small part. Fasten off and weave all ends into work.
Step 4: Join this whole front to the back by lining up the front to the back making sure the wrong sides are facing each other. Join thread in upper left corner of large pieces and work the same as for the first part. Leave the top open for now but you will be closing it before you are done.
Step 5: Slip the piece of plastic into the large pocket you just made. Close the top in the following way working through both pieces at the same time. Sc in first st on upper right corner. *5dc in next sc of top row. Sk 2 sts. Sc in next dc. Rep from * 3 times more. 5dc in next sc of top row. Sk next 2 dc. Sc in corner st. Fasten off and weave ends into back of work.
Step 6: Cut Magnet strip into 3 2½" pieces and glue them to the back of your back piece. One at the top, one at the bottom and one in the middle.
Step 7: Insert your notebook or index cards into the small front pocket and stick it onto your fridge!

