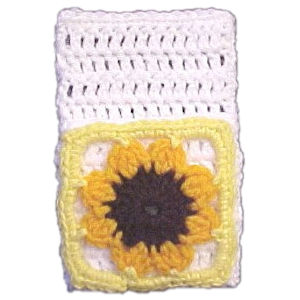
Sunflower Memo Pad Holder Fridgie
 Designed By Julie A. Bolduc
This memo pad holder is just the right size to hold a 3"x5" pad or stack of index cards. You can also keep a pen tucked inside.
Materials Needed:
Worsted weight acrylic yarn in white
Worsted weight acrylic yarn in yellow
Worsted weight acrylic yarn in brown
Worsted weight acrylic yarn in orange
Size H/8 aluminum crochet hook
Yarn needle for stitching pieces together and for weaving in ends
Piece of 7 count plastic canvas 41 x 26 holes
2 pieces ½" wide Magnet strips 3" long
Hot Glue and gun
Yarn Thickness: 4mm
Gauge: 4dc = 1"
Finished Size: 4"x6½"
Skill Level: Beginner
Instructions
RND 1 Flower: With brown. Ch4, join w/slst to first ch to form ring. Ch3, 15dc in ring. Join w/slst to top of ch3. Fasten off brown.
RND 2: Join orange in same st as slst. Ch3, yo, insert hook in nsame st as slst, yo pull up a lp, yo, draw through 2 lps on hook, yo, pull through all lps on hook. Ch2. slst in next dc. Ch2. *Yo, insert hook in nsame st as slst, yo pull up a lp, yo, draw through 2 lps on hook, twice. Yo, pull through all lps on hook. Ch2. Slst in next dc. Ch2. Rep from * around. Join w/slst to top of first petal. Fasten off orange. You can quit now and just make a flower magnet at this point if you want.
RND 3: Join yellow in same st as slst. Ch1. Sc in same st. (Ch4. Sc in top of next petal. Ch6.) *Sc in top of next petal. Rep bet () once. Rep from * around. Join w/slst to
first sc.
RND 4-11: Ch1. Sc in same st as slst. (4sc in next ch4 sp. Sc in top of next petal. 4sc, ch2, 4sc in next ch6 sp.) *Sc in next petal. Rep bet () once. Rep from * around. Join w/slst to first sc. Fasten off. Weave ends into back of work. Set aside flower square.ROW 1 Backing front piece: Ch15. Sc in 2nd ch from hook and in each ch across. Ch3, turn.
ROW 2: Sk very first sc. Dc in each sc across. Ch3, turn.
ROW 3-7: Sk very first dc. Dc in each dc across. Ch3, turn. At the end of row 7, ch1, turn.
ROW 8: Sc in each st across. Fasten off. Weave ends into back of work. Set aside.
ROW 1-7 Backing back piece: Rep rows 1- 7 of front piece.
ROW 8-11: Rep row 3 of front piece. At the end of row 11, ch1, turn.
ROW 12: Rep row 8 of front piece.
STEP 1 Assembly: Stitch sunflower square to front piece on the right side. Use a hidden stitch, (Stitch through the "hump" on the back side of the last round on the flower square.) Put each stitch just under the front and back lp of the last row of the front piece then through 1 strand of the sides of the front piece then across the bottom just above the starting row. This will make the flower square look like it was glued on.
STEP : Line up row 1 of front piece to row 1 of back piece making sure the right side of each piece is facing you. Stitch all layers together onto the plastic canvas using a whip stitch. Go all the way around the outside edge only. Glue magnet strips to the top and bottom of the message pad on the back.
Design written on Monday, July 19, 2004. Copyright ©2004 By Julie A. Bolduc p105016

