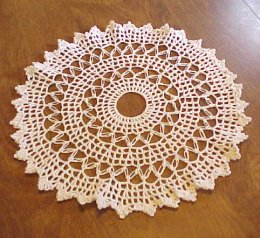
Trilogy Doily
 Designed By Julie A. Bolduc
This doily gets it's name from the 3 sections of filet stitches that are separated from the 2 rounds of Lover's Knot Stitches. You could put a votive candle in the center of this doily for a very attractive centerpiece on a table.
Materials Needed
America's Best Crochet Cotton in white. Size 10 crochet cotton.
Size 6 steel crochet hook
Tapestry needle for weaving in ends.
Yarn Thickness: 10thread
Gauge: 8sc=1"
Finished Size: 11" diameter
Skill Level: Intermediate
Instructions
RND 1: Ch36. Being careful not to twist chain, join w/slst to first ch to form ring. Ch5. *Dc in next ch. Ch2. Rep from * around. Join w/slst to 3rd ch of ch 5.
RND 2-3: Ch5. *Dc in next dc. Ch2. Rep from * around. Join w/slst to 3rd ch of ch5.
Lover's Knot. This may not be the correct way of doing the lover's knot but it is the way I did it for this pattern.
RND 4: Ch1, sc in same st as slst. (Now pull the thread that is on the hook so that it is about ½" long. Yo, pull through loop. ch1. Sc in the long loop you made over just one strand. The center strand that is to the left of the loop.) This completes the first part of the whole stitch. Then repeat one more time bet ( ) to complete the stitch. This is how you will do each lovers knot around.
Start each lovers knot as a sc. *Sk next dc, lovers knot in next dc. Rep from * around. Join w/slst to first sc of first lover's knot then make that loop ½long and slst to the next sc of the first lover's knot to start your next row. Yes this will double up this spot but it will not show much.
RND 5: On this round, you will be working on the center sc of each lovers knot. Ch6. *Sc in center of next lover's knot. Ch6. Rep from * around. Join w/slst to first sc.
RND 6: Ch5. Sk next 2 ch. Dc in next ch. Ch2. Dc in next ch. Ch2. Sk next 2 chs. *Dc in next dc. Sk next 2 ch. Dc in next ch. Ch2. Dc in next ch. Ch2. Sk next 2 chs. Rep from * around. Join w/slst to 3rd ch of ch5.
RND 7: Ch5. Dc in same st as slst. Ch2. Dc in next dc. Ch2. Dc in next dc. Ch2. *Dc, ch2, dc in next dc. Ch2. Dc in next dc. Ch2. Dc in next dc. Ch2. Rep from * around. Join w/slst to 3rd ch of ch5.
RND 8: Ch5. *Dc in next dc. Ch2. Rep from * around. Join w/slst to 3rd ch of ch5.
RND 9: Rep rnd 4.
RND 10-13: Rep rnds 5-8.
RND 14: Ch5. Work the foll in the first ch2 sp. Dc, ch3, dc, ch5, dc, ch3, dc, ch2. Dc in next dc. Ch3. Sk next ch2 sp and the next dc. Sc in next ch2 sp. Ch4, slst in 4th ch from hook. Sc in same ch2 sp. Ch3. *Sk next dc and ch2 sp. Dc in next dc. Work the foll in the next ch2 sp. Dc, ch3, dc, ch5, dc, ch3, dc, ch2. Dc in next dc. Ch3. Sk next ch2 sp and the next dc. Sc in next ch2 sp. Ch4, slst in 4th ch from hook. Sc in same ch 2 sp. Ch3. Rep from* around. Join w/slst to 3rd ch of ch5. Fasten off and weave ends into work.
Iron and starch as needed until you reach the desired effect. I let the edges be a little wavy.
Design written on Wednesday, August 04, 1999. Copyright ©1999 By Julie A. Bolduc p111006

