
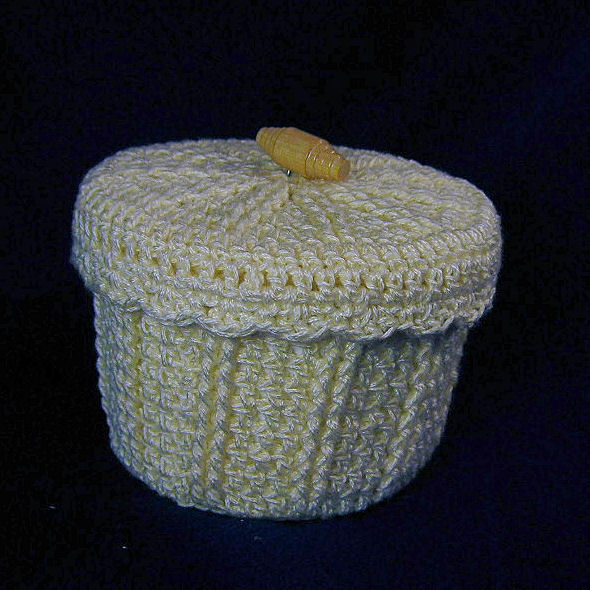
Small Boutique Box
 Designed By Julie A. Bolduc
This small crocheted boutique box is fun and easy to make and makes use of an empty cottage cheese container! Another opportunity to recycle!
Materials Needed
1 Skein Cream Colored Luster Sheen
Size E/4 or 3.5mm aluminum crochet hook
1 Empty clean 16 oz cottage cheese tub with lid
1 wooden shank style button .5" x 1.25" for knob
.25" paper punch
White Krylon Fusion Spray paint for plastic if needed
Yarn Thickness: 2mm
Gauge: 6dc=1"
Finished Size: 5" x 4.5"
Skill Level: Intermediate
Special Stitch Used: Front Post Double Crochet (fpdc) You can read how it is done at the following URL. https://www.jpfun.com/reference/stitches/fpbpd.shtml
Instructions
Prepare tub and lid:
STEP1: Punch 44 holes evenly spaced around rim of cottage cheese container.
STEP 2: Cut lip off of lid so the lid is flat. Drill 1/8" hole in center of lid.
STEP 3: Spray paint the outside of the tub and the top of the lid to cover up markings and allow to dry.
Crochet Tub Bottom
RND 1: Ch4. Join w/slst to first ch to form ring. Ch3. 10 dc in ring. Join w/slst to top of ch3. (11dc)
RND 2: Ch3. Dc in same st as slst. 2dc in each st around. Join w/slst to top of ch 3. (22dc)
RND 3: Ch3. Dc in same st as slst. Dc in next st. *2dc in next st. Dc in next st. Rep from * around. Join w/slst to top of ch3. (33dc)
RND 4: Ch3. Dc in same st as slst. Dc in each of the next 2 sts. *2dc in next st. Dc in each of the next 2 sts. Rep from * around. Join w/slst to top of ch3. (44dc)
RND 5: Ch3. Dc in same st as slst. Dc in each of the next 3 sts. *2dc in next st. Dc in each of the next 3 sts. Rep from * around. Join w/slst to top of ch3. (55dc)
RND 6: Working in back lp only for this round only. Ch3, dc in each st around. Join w/slst to top of ch3.
RND 7: Ch3. Dc in each of the next 2 dc. Fpdc in each of the next 2 dc. *Dc in each of the next 3 dc. Fpdc in each of the next 2 dc. Rep from * around. Join w/slst to top of ch3.
RND 8-15: Ch3. Dc in each of the next 2 dc. Fpdc in each of the next 2 fpdc. *Dc in each of the next 3 dc. Fpdc in each of the next 2 fpdc. Rep from * around. Join w/slst to top of ch3. At this point, weave the starting end in because you are going to join your work to your prepared tub during the next round.
RND 16: Slip work onto tub. *Sc in each of the next 3 stitches working through one hole per stitch. Work both of the next 2 sc in one hole together. Rep from * around. Join w/slst to first sc. Fasten off and weave end into work and set aside tub.
Lid bottom:
RND 1: Ch4. Join w/slst to first ch to form ring. Ch3. 10 dc in ring. Join w/slst to top of ch3. (11dc)
RND 2: Ch3. Dc in same st as slst. 2dc in each st around. Join w/slst to top of ch 3. (22dc)
RND 3: Ch3. Dc in same st as slst. Dc in next st. *2dc in next st. Dc in next st. Rep from * around. Join w/slst to top of ch3. (33dc)
RND 4: Ch3. Dc in same st as slst. Dc in each of the next 2 sts. *2dc in next st. Dc in each of the next 2 sts. Rep from * around. Join w/slst to top of ch3. (44dc)
RND 5: Ch3. Dc in same st as slst. Dc in each of the next 3 sts. *2dc in next st. Dc in each of the next 3 sts. Rep from * around. Join w/slst to top of ch3. (55dc)
RND 5: Ch3. Dc in same st as slst. Dc in each of the next 3 sts. *2dc in next st. Dc in each of the next 4 sts. Rep from * around. Join w/slst to top of ch3. (66dc) Fasten off and weave ends into back of work. Set aside for now.
Lid Top:
RND 1: Ch4. Join w/slst to first ch to form ring. Ch3. 10 dc in ring. Join w/slst to top of ch3. (11dc)
RND 2: Ch3. Dc in same st as slst. 2dc in each st around. Join w/slst to top of ch 3. (22dc)
RND 3: Ch3. Fpdc in each of the next 2 dc. *Dc in same dc as last fpdc. Fpdc in each of the next 2 dc. Dc in same dc as last fpdc. Rep from * around. Join w/slst top of ch3.
RND 4: Ch3. Dc in same st as slst. Fpdc in each of the next 2 fpdc. *2dc in next dc. Fpdc in each of the next 2 fpdc. Rpe from * around. Join w/slst to top of ch3.
RND 5: Ch3. Dc in same st as slst. Dc in next st. Fpdc in each of the next 2 fpdc. *2dc in next dc. Dc in next dc. Fpdc in each of the next fpdc. Rep from * around. Join w/slst to top of ch3.
RND 6: Ch3. 2dc in next st. Dc in next st. Fpdc in each of the next 2 fpdc. *Dc in next dc. 2dc in next dc. Dc in next dc. Fpdc in each of the next 2 fpdc. Rep from around. Join w/slst to top of ch3. Do not fasten off. Weave starting end in.
RND 7: Pick up crocheted lid top and work the top to the bottom lid wrong sides facing each other. Ch3. Dc in each st around but before closing, slip plastic lid into work and continue working a dc in each st around. Join w/slst to top of ch3.
RND 8: Ch3. Dc in each dc around. Join w/slst to top of ch3. You are now going to notice you have spaces between each dc because of stretching. You will be working in these spaces for the next round.
RND 9: Slst into the next sp. Ch1. Sc in same sp. Sc in each of the next 2 spaces. Ch2. *Sc in each of the next 3 spaces. Ch2. Rep from * around. Join w/slst to first sc.
RND 10: Slst into the next sc. Ch1, sc in same sc. 3dc in next ch2 sp. Sk next sc. *Sc in next sc. 3dc in next ch2 sp. Sk next sc. Rep from * around. Join w/slst to first sc. Fasten off and weave ends into work. Sew button to center top of lid through hole.
Design written on Wednesday, May 02, 2007. Copyright ©2007 By Julie A. Bolduc p114095
All items in our online shop ship free within the US only. I currently offer U.S. shipping only and it is from rural Maine. Delivery can vary from 2–14 days depending on your distance from Maine. Expedited shipping is not available.
Please note: I am now selling all of my paper bead making tools and other items from this web site using Paypal payments.
I have removed all of my paper bead making tools from Amazon. My Kindle crochet pattern books and paper template paperback books continue to be available on Amazon, as they are printed and fulfilled directly by Amazon. A limited number of paper bead making tools remain available on Etsy but I am not linking to those tools from this site.
Random Quick Tip!
More Moisture Resistant Paper BeadsTo coat the inside of your paper beads, and make them a little more moisture resistant, spread a thin layer of glue on the back side of your strips and allow them to dry, before rolling them up. They will still roll up well and the inside of your bead will be protected.