
Tapestry Crochet Easter Egg
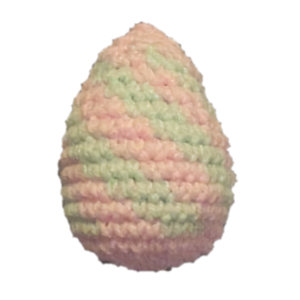 Designed By Julie A. Bolduc
This egg, even though it is made of yarn, could be easily made of thread instead. It uses a technique I recently learned how to do, Tapestry Crochet. A method of crocheting 2 colors at a time, carrying one color along as you work the other color.
Materials Needed
Small amounts Sport Weight acrylic yarn in two colors. I used pale green and pink in the example. Red Heart Brand.
Size G/6 or 4.25mm aluminum crochet hook
Polyester Stuffing
Yarn needle
Yarn Thickness: 3mm
Gauge: 5sc =1"
Finished Size: 3½"x2½"
Skill Level: Intermediate, but beginner in Tapestry Crochet.
Instructions
RND 1: With Pink. Ch3, join w/slst to first ch to form ring. Ch1, work 8sc in ring. Do not join rounds but mark the beg of each round.
RND 2: Work 2sc in each of the 8 sc around. (16sc)
RND 3: *Sc in next sc. 2sc in next sc. Rep from * 7 times more. (24sc.)
RND 4: *Sc in next sc. 2sc in next sc. Rep from * until you have 32 sc.
RND 5: Do not cut yarn, but join green in next stitch. Work 1 sc in each of the next 4 sc in green working over the strand of pink, (carry the pink along the top of the stitches and work over them.) Then drop the green and with the pink, work 1 pink sc in each of the next 4 stitches, working over the green strand. Keep working in this manner around. 4green and 4 pink. When you get back to where you started, you will be starting the spiral effect.
RND 6-10: work in this way from here on out, every time I tell you to change a color, just drop one, to work over it and pick up the other one. Each row will have the following in it. 2pink, 4green, 4pink, 4green, 4pink, 4green, 4pink, 4green, 4pink. Notice I started and ended with pink. This will create a section that is 6 pink stitches wide at the beg and end of each round.
RND 11: This is where you will start decreasing. To decrease, work 2sc together in this way. Insert hook in next stitch, draw up a loop, insert hook in next stitch, draw up a loop, yo and draw through all 3 loops on hook. This will be referred to as dec1. with pink, dec1. 4green. 2pink, dec1, 4green 2pink, dec1, 4green, 2pink, dec1, 4green, 4pink.
RND 12: 1 pink, 2green, dec1with green. 3pink, 2green dec1w/green, 3 pink, 2green dec1w/green, 3 pink 2green dec1w/green, 4pink.
RND 13: Dec1w/pink. 3green. 1pink, dec1w/pink, 3green. 1pink, dec1w/pink, 3green, 1pink, dec1w/pink, 3green, 2pink.
RND 14: 1 pink, 1green, dec1w/green, 2pink, 1green, dec1w/green, 2pink, 1green, dec1w/green, 2pink, 1green, dec1w/green, 2pink.
RND 15 to end. Stuff egg then work the following around till you end up with 6sc. Carry the green but work in pink. Dec1, sc 1. Finish by fastening off the ends and then gather up the 6sc and weave ends into work.
Design written on Friday, April 21, 2000. Copyright ©2000 By Julie A. Bolduc f116008
All items in our online shop ship free within the US only. I currently offer U.S. shipping only and it is from rural Maine. Delivery can vary from 2–14 days depending on your distance from Maine. Expedited shipping is not available.
Please note: I am now selling all of my paper bead making tools and other items from this web site using Paypal payments.
I have removed all of my paper bead making tools from Amazon. My Kindle crochet pattern books and paper template paperback books continue to be available on Amazon, as they are printed and fulfilled directly by Amazon. If you would like to shop my Etsy Store, follow the link in the header above.