
You must be a member and logged in to see this pattern.
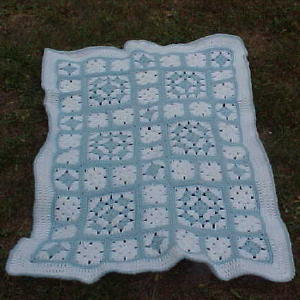
Will's Puff Stitch Granny Square Afghan
Designed By Julie A. BolducThis afghan is named for the newest member of my family. My nephew William born on May 31, 2002. I designed the squares just for this afghan. You can use the squares in any project however.
Materials Needed
12oz Baby blue worsted weight yarn
8oz White worsted weight yarn.
Size H/8 or 5mm aluminum crochet hook
Yarn Needle for weaving in ends and for whip stitching the squares together.
Yarn Thickness: 4mm
Gauge: 4dc=1"
Finished Size:
Skill Level: Intermediate
Puff Stitch (pfst): Yo, insert hook in space indicated, pull up a long loop three times. Yo, pull yarn through all lps on hook. DO NOT ch1 after pulling yarn through all lps.
Instructions
There are 3 squares each slightly different from each other. The two small ones are just 3 rnds and the large one is 6 rnds. Make all of the squares first then assemble them. This is a time consuming afghan to make so be sure to have plenty of time to make it before starting this project. The only reason it takes so much time is there are many ends to weave in. To save time, you could make all of the squares out of one piece of yarn and make each square a different color.

Picture of Square 1
RND 1: With Blue, ch4, join w/slst to first ch to form ring. Ch3, pfst in ring. Dc in ring. Ch3. *Dc in ring. Pfst in ring. Dc in ring. Ch3. Rep from * 2 times more. Join w/slst to top of ch3. Fasten off blue, weave ends through back of work.
RND 2: Join white in any of the ch3 corner spaces. Ch3. Pfst, dc, ch3, dc, pfst, dc in same sp. Ch1. *Dc, pfst, dc, ch2, dc, pfst, dc in next ch3 corner sp. Ch1. Rep from * around. Join w/slst to top of ch3. Fasten off white. Weave ends into back of work.
RND 3: Join blue in same st as slst. Ch1. Sc in each st around but work a sc, ch2, sc in each ch2 corner sp and a sc in each ch1 sp around. Join w/slst to ch1. Fasten off blue. Weave ends into back of work. Set these squares aside.
 Square 2: Make 34
RND 1: With white, ch4, join w/slst to first ch to form ring. Ch3, pfst in ring. Dc in ring. Ch3. *Dc in ring. Pfst in ring. Dc in ring. Ch3. Rep from * 2 times more. Join w/slst to top of ch3.
RND2: Slst to the first ch3 sp. Ch3. Pfst, dc, ch3, dc, pfst, dc in same sp. Ch1. *Dc, pfst, dc, ch2, dc, pfst, dc in next ch3 corner sp. Ch1. Rep from * around. Join w/slst to top of ch3. Fasten off white. Weave ends into back of work.
RND 3: Repeat rnd 3 of Square 1. Set these squares aside.

Square 3: Make 6
Starting with blue.
RND 1 & 2: Repeat rnds 1& 2 of Square 1.
RND 3: Join blue in any ch2 corner sp. Ch3, pfst, dc, ch2, dc, pfst, dc in same sp. Ch1. Dc, pfst, dc in next ch1 sp. Ch1. *Dc, pfst, dc, ch2, dc, pfst, dc in next ch2 corner sp. Ch1. Dc, pfst, dc in next ch1 sp. Ch1. Rep from * around. Join w/slst to top of ch3. Fasten off blue. Weave ends into back of work.
RND 4: Join white in any ch2 corner sp. Ch3, pfst, dc, ch2, dc, pfst, dc in same sp. Ch1. Dc, pfst, dc in next ch1 sp. Ch1. Dc, pfst, dc in next ch1 sp. Ch1. *Dc, pfst, dc, ch2, dc, pfst, dc in next ch2 corner sp. Ch1. Dc, pfst, dc in next ch1 sp. Ch1. Dc, pfst, dc in next ch1 sp. Ch1. Rep from * around. Join w/slst to top of ch3. Fasten off white.
RND 5: Join blue in same st as slst. Ch1. Sc in each st around but work a sc, ch2, sc in each ch2 corner sp and a sc in each ch1 sp around. Join w/slst to ch1.
RND 6: Ch1. Sc in each st around but work a sc, ch2, sc in each ch2 corner sp and a sc in each ch1 sp around. Join w/slst to ch1. Fasten off blue, weave ends into back of work. Set these squares aside.
Assembly
The afghan is assembled by making strips of the squares then whip stitching the strips together. First of all, use blue yarn to whip stitch all the squares together.
Mini Strip: Make 17. Whip stitch 2 of the Square 2's together. Set aside.
Strip 1: Make 4. Whip stitch the squares together in this order, on the short sides of the mini strips. Weave in the ends as you each seam. Square 1, Mini Strip, Square 1, Mini Strip, Square 1.
Strip 2: Make 3. Whip stitch the squares togehter in this order. Stitch the long sides of the mini strips to the sides of the large square. Weave in the ends as you complete each seam. Take care to line up the center of the large squares to the center seam of the mini strip. You may have to fudge here. I did.
Mini Strip, Square 3, Mini Strip, Square 3, Mini Strip.
Stitching the strips together.
Whip stitch the strips together in the following order along the long sides. Take care to match up the corners. You may have to ease in the seams of the mini strips to make things line up.
Strip 1, strip 2, strip 1, strip2, strip 1, strip 2, strip 1.
Border
With blue.
RND1 & 2: Join yarn to any stitch, ch1 then sc around the whole afghan. It does not matter how many sts you end up with as long as you work the following in each of the four corners. 1sc, ch2, 1sc. Join w/slst to ch1.
RND 3: Join white in any stitch. Ch3, Dc in each sc around but work 2dc, ch2, 2dc in each ch2 corner sp. Join w/slst to top of ch3.
RND 4 & 5: Ch3. Dc in each dc around but work 2dc, ch2, 2dc in each ch2 corner sp. Join w/slst to top of ch3. Fasten off white. Weave ends into back of work.
RND 6: Join blue to any stitch. You have a choice. You can either slst in each st around or you can work a reverse single crochet in each stitch around the opposite way. It's up to you. I worked a reverse single crochet in each st around in the afghan I made. Fasten off, weave ends into back of work.
Design written on Saturday, July 20, 2002. ©2002-2019 By Julie A. Bolduc p120002
JPF Crochet Club where Crocheting is Just Plain FunThis crochet pattern is for personal use only and is not to be resold.
Sheetworks Studio Version 2.5 — Free Download! - Two New Categories Added, Graph Paper and Quilt Blocks
All items in our online shop ship free within the US only. I currently offer U.S. shipping only and it is from rural Maine. Delivery can vary from 2–14 days depending on your distance from Maine. Expedited shipping is not available.
Please note: I am now selling all of my paper bead making tools and other items from this web site using Paypal payments.
I have removed all of my paper bead making tools from Amazon. My Kindle crochet pattern books and paper template paperback books continue to be available on Amazon, as they are printed and fulfilled directly by Amazon. A limited number of paper bead making tools remain available on Etsy but I am not linking to those tools from this site.
Random Quick Tip!
Sending Crochet HooksIf you need to send crochet hooks in the mail, you could flatten a paper towel tube, cut it so it is 7" long, then tape one end to seal it. I suggest using Fiber Tape for strength. Then put the hooks inside the tube, they should be wrapped in tissue paper, then seal up the other end. Then you can put this protective tube inside a 6"x9" envelope for sending through the mail. This way they should not work themselves out of the envelope. You could even send them in a business size envelope that is made manilla paper. That way it is not sooo big.