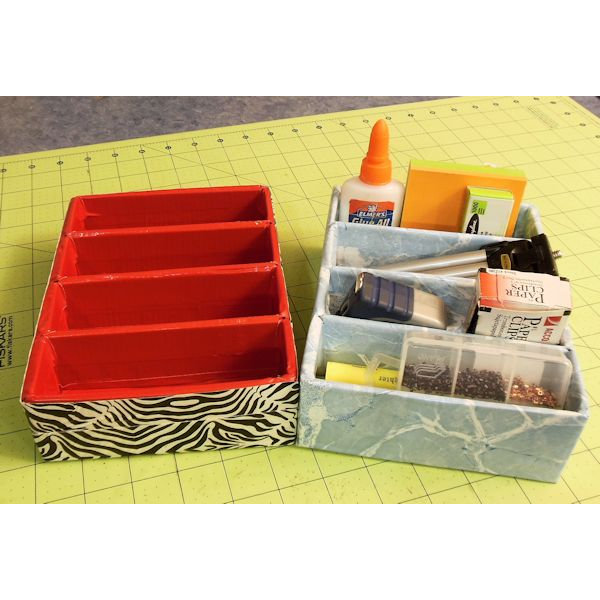
Desk Top Caddy

Designed By Julie A. Bolduc
This Desk Top Caddy is made with scraps from Priority Mail Boxes and duck Tape! The little compartments are just the right size to fit the little things that clutter up your desk!
- Materials Needed
- 2 Rolls duck Tape of 1 each of 2 colors
- 4 Scrap Pieces from Small Flat Rate Priority Boxes, the ones that are about 7" x 6" x 1 3/4" in size
- Double Sided tape or other adhesive
- 2 Pieces corrugated Cardboard 2-1/2" x 7" for the Long Sides
- 2 Pieces corrugated Cardboard 2-1/2" x 6-1/2" for the Short Sides
- 1 Piece corrugated Cardboard 6-1/2" x 8" for the Back
Finished Size: 7"L x 6"w x 2"d
Skill Level: Intermediate to Advanced
Instructions
Make sure you watch the video to help clarify any questions you may have about each step of the instructions.
This project uses the left over pieces from making the Mini Organizer so you should already hve your basic postage box pieces ready.
Step 1: Covering the inside of the boxes. You are going to want to cover the inside of the boxes before you assemble them. Use your solid color duck tape and put strips across the bottom edge starting at the left side crease. Make sure to line the edge of the tape to the crease along the long edge, not the cut edge. Do this for all 4 boxes.
Step 2: Trim off any excess box piece that may protrude along the long cut edge that sticks out beyond the edge of the duck tape.
Step 3: Lay another long piece of tape on the first strip of tape overlapping about 1 inch to overhang the cut edge. Fold the overhanging part of the tape to the back side of the edge to give it a finished edge.
Step 4: Preparing the backs of each box. You will be using your inside color tape for this step. Fold up the flaps on either side of the left hand flaps and the little flap further up. The little flap will tuck inside the slit that is form when you fold over the left hand side flap. Use your adhesive to keep the flaps in place.
Step 5: Place a piece of the duck tape across the folded over section making sure to cover the lower crease. This will cover the inside back of the storage rack. Repeat this step for all 4 boxes.
Step 6: Close all 4 boxes by tucking the small tab into the slit and removing the sticky section cover to expose the sticky strip. Secure the sticky strip to the side of the box forming the little box that is open at one end with the duck tapes flapping! You may want to add more adhesive to this little flap to make sure it stays.
Step 7: Assemble the Boxes. Set the box down on your work surface and stick a piece of double sided tape or other adhesive on each of the 4 edges of the top side of the box.
Step 8: Pick up a second box, set it on top of the first box lining up the edges and pressing down to activate the tape or adhesive. Repeat this step with the last 2 boxes.
Step 9: Preparing corrugated cardboard pieces. I purposely told you to make these pieces bigger than you will actually need so you can trace the actual sizes you will need using the assembled boxes. These cardboard pieces is what will make the box rigid and strong. Set your assembled boxes on top of one of the short sided pieces of cardboard. With a pencil, trace around the short side of the box and trim it off to fit. With the double sided tape or adhesive, stick the piece to a short side of your organizer. Repeat for the other short side and each of the long side pieces. Then do the back piece last the same way.
Step 10: Finish Covering with first roll of duck Tape. Start with cutting 3 strips of your inside color duck tape slightly shorter than the width of the short sides of your organizer. Cover the 3 dividers inside your organizer to cover up the seams.
Step 11: Wrap the whole perimeter of your box with the inside color of your organizer making sure to let it over hang the top side by about 1". Start and end on a short end.
Step 12: Cut a slit on the long sides in the 3 points where the dividers are and at each of the 4 corners. Fold over the flaps where you made the slits to secure them to the inside of your caddy. You are done with the inside color of your duck tape!
Step 13: Wrap the whole perimeter with the colorful duck tape making sure to overlap the bottom edge about 1". Cut a slit at each corner and fold it over to the bottom of your organizer.
Step 14: Wrap a 2nd piece of the colorful duck tape around the whole perimeter making sure to line the top edge of the tape with the top edge of the caddy. Start and end on the center of a short side. NOTE: in the video, I wrapped the zebra print tape around the top edge first then did the bottom. I should have done it the way I explained in these instructions.
Step 15: Back Side. Cut 3 strips slightly shorter than your caddy is long. Lay them down in front of you on your work surface and overlap the long edges slightly to form a "Fabric". Pick up this whole piece and place on the back side of your caddy making sure to cover the brown box piece.
Design written on October 11, 2014. Copyright ©2014 By Julie A. Bolduc f206001

