
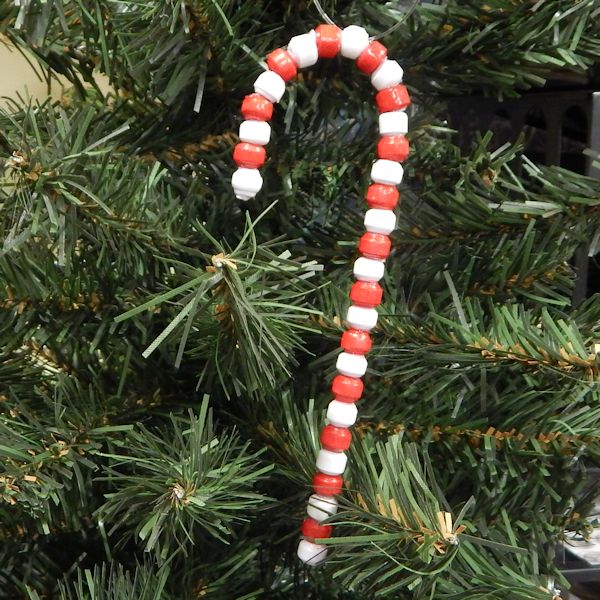
Paper Bead Candy Cane
 Designed By Julie A. Bolduc
This ornament is made with paper beads made to resemble pony beads and is shaped with a pipe cleaner!
- Materials Needed Makes 2 Candy Canes
- 1 Sheet 8-1/2" x 11" white copy paper
- 1 Sheet 8-1/2" x 11" red copy paper
- 2 Chenille Stems 12" long Desired color: I used white
- Special Cutting template, included. 1/4" x 1/8" x 11"
- White Glue
- Bead Glazing Supplies and tools
- Tools Needed
- Size 5/32" Short Paper Bead Roller
- Paper cutter of choice
- Glue palate & toothpick
- Needle Nose Pliers
Finished Size: 5-1/2"L x 1-3/4"W
Skill Level: Beginner
Instructions
Step 1: Print your cutting template. Make sure to set your margins to zero, the orientation to portrait and make sure to tell your printer to print borderless.
Step 2: Layer the cutting template on top of both sheets of copy paper. Use binder clips at one end to hole the sheets together while you cut the strips.
Step 3: Once you have cut your strips, roll them using your 5/32" paper bead roller.
Step 4: After you are done rolling the strips, glaze them as you normally would. The red copy paper may bleed so be sure to string and glaze them separately unless you like the idea and the look of a hint of pink on your white beads, sort of like real candy canes. Then you can string them alternately red, white, red, white, etc...
Step 5: Once your beads are dry. Get ready to put them on your chenille stem. One one of your chenille stems, bend down one end 1/2" smear glue all over this half inch section. Place two beads onto this 1/2" glue covered end starting with either a red or white one. Allow to dry before continuing.
Step 5: Once the 2 beads placed on the stem is secured into place and dry, 27 more beads alternating colors. Cut off your stem so you have 1" sticking out of the last bead you placed on the stem. Bend this one inch end in half to make it 1/2" long. Apply glue liberally to the end of the stem and add 2 more beads keeping the same color pattern. Allow to dry completely before continuing.
Step 6: Once the end beads are secure, bend into a candy cane shape and hang on your tree!
2nd Candy Cane: Repeat as for the first candy cane but start with the other color bead so you will have enough beads.
Note: The template makes 44 beads so with 2 sheets of paper you will get a total of 88 beads. Each candy cane uses 31 beads. You can color the white template pieces, with permanent marker, to make more beads to make 2 more candy canes.
Design written on December 21, 2014. Copyright ©2014 By Julie A. Bolduc f201002
All items in our online shop ship free within the US only. I currently offer U.S. shipping only and it is from rural Maine. Delivery can vary from 2–14 days depending on your distance from Maine. Expedited shipping is not available.
Please note: I am now selling all of my paper bead making tools and other items from this web site using Paypal payments.
I have removed all of my paper bead making tools from Amazon. My Kindle crochet pattern books and paper template paperback books continue to be available on Amazon, as they are printed and fulfilled directly by Amazon. A limited number of paper bead making tools remain available on Etsy but I am not linking to those tools from this site.
Random Quick Tip!
Coat the inside of Paper Beads.To coat the inside of paper beads, without letting them stick to everything. After you are done glazing the outside of the beads, thread a 6-8 inch piece of worsted weight yarn, (or yarn that will completely fill the hole, when doubled up), onto a needle that will fit inside the glazed and dried beads, dip the yarn, being careful not to get the needle wet, pass the wet yarn through the bead coating the inside only. If the glaze is on the outside of the hole, just wipe it off on a piece of paper towel. Set the bead aside to allow to dry.