
Spring Bath Tissue Cover
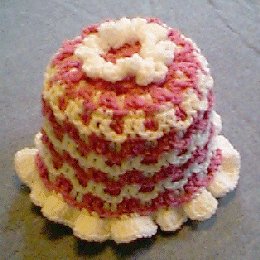
Designed by Julie A Bolduc
This bath tissue cover is made with a variation of a pattern stitch I develped for the JPF Crochet Club. It is a fun and versitle stitch to do. Plus this cover could be made in any color to suit your bathroom decor.
Materials Needed:
2oz each Red Heart Worsted Weight yarn. White and Raspberry. Or colors of choice.
Size H 8 or 5mm aluminum crochet hook.
Yarn Needle for weaving in ends
Yarn Thickness: 4mm
Gauge: 4sc=1"
Finished Size: Fits loosly over a roll of bath tissue
Skill Level: Beginner to intermediate
With Raspberry
RND 1: Ch4, join w/slst to first ch to form ring. Ch3, work 13 dc in ring. Join w/slst to top of ch3.
RND 2: Work in back lps only on this round. Ch3, dc in same st as slst. Ch2. *Sk next st, 2dc in next st. Ch2. Rep from * around. Join w/slst to top of ch3.
RND 3: Ch1, sc in same st as slst. 2sc in next dc. (Work 2dc in skipped st of pre rnd behind ch2 sp.) *2sc in each of the next 2 dc. Rep bet (). Rep from * around. Join w/slst to first ch.
RND 4: Ch3, dc in same st as slst. Ch2. *Sk next 2 sts, 2dc in next st. Ch2. Rep from * around. Fasten off raspberry.
RND 5: Join white in same st as slst. Ch1. Sc in next st. (Work 1dc in each of the 2skipped sts of prev rnd.) *Sc in each of the next 2 dc. Rep bet (). Rep from * around. Join w/slst to first ch.
RND 6: Ch3, dc in next sc. Ch2. * Sk the next 2 dc. Dc in each of the next 2 sc. Ch2. Rep from * around. Join w/slst to top of ch3. Fasten off white.
RND 7: Join raspberry in same st as slst. Ch1. Sc in next st. (Work 1dc in each of the 2skipped sts of prev rnd.) *Sc in each of the next 2 dc. Rep bet (). Rep from * around. Join w/slst to first ch.
RND 8: Ch3, dc in next sc. Ch2. * Sk the next 2 dc. Dc in each of the next 2 sc. Ch2. Rep from * around. Join w/slst to top of ch3. Fasten off raspberry.
RND 9-17: Rep rnds 5-8 until you reach rnd 17. At the end of rnd 17, do not fasten off. You should have finished with white. Plus the last rnd that you should have repeated is rnd 5.
RND 18: Ch3, 2dc in same st as slst. Work 3 dc in each st around. Join w/slst to top of ch3. Fasten off and weave ends into work.
Now go back to the first rnd where you left the front lps un worked. Join white to any of the front lps. Work the following in each front lp around. (Sc, ch2, 3dc, ch2, sc.) When you work all front lps. Join w/slst to first sc. Fasten off and weave ends into work.
Design written on Wednesday, March 03, 1999. Copyright ©1999 by Julie A. Bolduc all rights reserved. f122001
All items in our online shop ship free within the US only. I currently offer U.S. shipping only and it is from rural Maine. Delivery can vary from 2–14 days depending on your distance from Maine. Expedited shipping is not available.
Please note: I am now selling all of my paper bead making tools and other items from this web site using Paypal payments.
I have removed all of my paper bead making tools from Amazon. My Kindle crochet pattern books and paper template paperback books continue to be available on Amazon, as they are printed and fulfilled directly by Amazon. If you would like to shop my Etsy Store, follow the link in the header above.
Random Quick Tip!
Non Slip Quilting TemplatesIf you are having trouble cutting fabric with a rotary cutter and cutting templates, because the template slips, and you don't need to be able to see through the template or ruler, you can use put non skid shelf liner on the back side applied with double stick tape. I do this for my little hexagon templates for English Paper Piecing. That way, the non skid liner sticks to the fabric and the fabric will move with the ruler as you cut your shapes out. Just put the double stick tape on the back of the template, then lay the template onto the non skid liner and cut it out as if you were cutting fabric with the template. Really Easy!