
Sheetworks Studio Version 2.4.1 — Free Download!
All items in our online shop ship free within the US.
I currently offer U.S. shipping only.
Little Filet Bun Cover
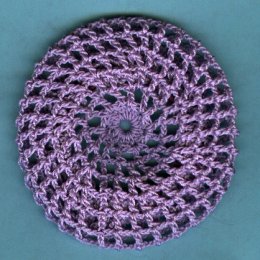
Designed by Julie A Bolduc
This bun cover is the first attempt I made to design one. That is why it ended up small. I really did not know what I was doing. So, you can use it if you do not have a lot of hair to put in a bun or you can use it as a jar topper.
Materials Needed:
Small amount DMC Traditions Size 10 Crochet Cotton. Lavender #5211
Medium size Goody Brand hair Elastic
Size 6 Steel crochet hook
Tapestry Needle for weaving in ends
Yarn Thickness: 10thread
Gauge: First rnd is ¾" diameter.
Finished Size: 3"diameter.
Skill Level: Beginner

If you need to make the bun cover bigger, you can increase the number of rows just before adding to the elastic. And you can use a bigger hook. A size 5.
InstructionsRND 1: Ch6. Join w/slst to first ch to form ring. Slst into ring. Ch3, (yo, insert hook in ring, draw up a loop, draw through 2lps on hook.) Rep bet () one more time, then yo and draw through last 3 lps on hook. Bobble Made. Ch2. *Rep bet () 3 times then yo and draw through all 4 lps on hook. Bobble Made. Ch2. Rep from * 5 times more. Join w/slst to top of first bobble made.
RND 2: Slst into the first ch2 sp. Ch5. Dc in same sp. Ch2. *Dc, ch2, dc in next ch2 sp. Ch2. Rep from * around. Join w/slst to 3rd ch of ch5.
RND 3: Ch5. Dc in next dc. Ch2. Dc in next ch2 sp. Ch2. *Dc in next dc, ch2 twice. Dc in next ch2 sp. Ch2. Rep from * around. Join w/slst to 3rd ch of ch5.
RND 4: Ch5. Dc in next dc. Ch2. Dc in next dc. Ch2. Dc, ch2, dc in next dc. Ch2. *Dc in next dc, ch2 two times. Dc, ch2, dc in next dc. Ch2. Rep from * around. Join w/slst to 3rd ch of ch5.
RND 5: Ch5. Dc in next dc. Ch2. Dc in next dc. Ch2. Dc in next ch2 sp. Ch2. Dc in next dc. Ch2. *Dc in next dc, ch2, 3 times. Dc in next ch2 sp. Ch2. Dc in next dc. Ch2. Rep from * around. Join w/slst to 3rd ch of ch5.
RND 6-10: Ch5. *Dc in next dc. Ch2. Rep from * around. Join w/slst to 3rd ch of ch5.
This next part is a little tricky. You will be adding the elastic. It will have a woven effect.
RND 11: Hold the elastic behind your work. Ch5. *Dc in next dc behind the elastic. Ch2. Dc in next dc in front of the elastic. Ch2. Rep from * around. This may not come out evenly. Don't worry about it, it will not show. Join w/slst to 3rd ch of ch5.
RND 12: Ch5. Dc in next ch2 sp. Ch2. *Dc in next dc. Ch2. Dc in next ch2 sp. Ch2. Rep from * around. Join w/slst to 3rd ch of ch5. Fasten off and weave ends into work.
You can decorate it with a ribbon if you like.
NOTE: If you do not want to use the elastic, you can use a ribbon in the 11 round instead. Just weave it through and tie it on. It may work better this way anyway.
Also if you want to make this longer, you can increase your number of rows worked in rows 6-10
.Design written on Thursday, July 22, 1999. Copyright © 1999 By Julie A. Bolduc p109008