
Sunshine Bliss Potholder
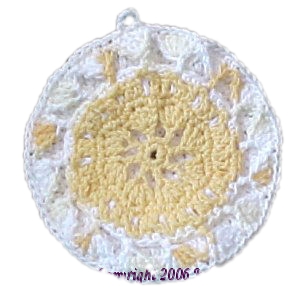 Designed By Julie A Bolduc
This potholder has a stitch that is new to me. I am not sure if this stitch exists but it is fun and easy to do.
Materials Needed
Worsted weight cotton yarn in Daisy Ombre, Peaches & Creme
Worsted weight cotton yarn in yellow, Peaches & Creme
Worsted weight cotton yarn in off white, Peaches & Creme
Size H/8 aluminum crochet hook
Yarn needle for stitching pieces together and for weaving in ends
Yarn Thickness: 3mm
Gauge: 4dc = 1"
Finished Size: 7"diam
Skill Level: Intermediate
Instructions
Special Stitch Starting Treble Fan Stitch A(Starting trfsa): Ch4. 3dc in 3rd ch from hook.
Special Stitch Starting Treble Fan Stitch B (starting trfsb): Ch4, 4dc in 3rd ch from hook.
Special Stitch Treble Fan Stitch A (trfsa): Work a treble stitch in next st. Work 3 dc through lp on treble post.
Special Stitch Treble Fan Stitch B (trfsb): Work a treble stitch in next st. Work 4 dc through lp on treble post.
Front Side:
RND 1: With yellow. Ch2. 8sc in 2nd ch from hook. Join w/slst to first sc.
RND 2: 1 Starting trfsa. Work 1 trfsa in each st around. Join w/slst to top of ch4.
RND 3: Ch1. 2sc in each of the next 2dc. Sc in next st. *Sc in next st. 2sc in each of the next 2 sts. Sc in next sc. Rep from * around. Join w/slst to ch1.
RND 4: Ch5. (Sk 1 st. Dc in each of the next 2 sts. ch2. Sk 1 st. Dc in next st.) *Dc in next st. Ch2. Rep bet () once. Rep from * around. Join w/slst 3rd ch of ch5. Fasten off yellow.
RND 5: Join ombre in same st as slst. Ch1. (Dc in skipped stitch behind ch2 sp. Sc in next dc.) *Sc in next dc. Rep bet () once. Rep from * around. Join w/slst to ch1.
RND 6: Slst into the next dc. Starting trfsb in same st. Ch1. Sk 2 sts. *Trfsb in next st. Ch1. Sk 2 sts. Rep from * around. Jon w/slst to top of ch4. Fasten off. Weave ends into back of work.
Back:
RND 1 With off white. Ch5. Join w/slst to first ch to form ring. Ch3. 15 dc in ring. Join w/slst to top of ch3.
RND 2: Ch3. Dc in same st as slst. 2dc in each st around. Join w/slst to top of ch3.
RND 3: Ch3. 2dc in next st. *Dc in next st. 2dc in next st. Rep from * around. Join w/slst to top of ch3.
RND 4: Ch3. Dc in same st as slst. Dc in each of the next 2 sts. *2dc in next st. Dc in each of the next 2 sts. Rep from * around. Join w/slst to top of ch3.
RND 5: Ch3. Dc in each of the next 2 sts. 2dc in next st. *Dc in each of the next 3 sts. 2dc in next st. Rep from * around. Join w/slst to top of ch3. DO NOT fasten off. Weave starting end into back of work.
Finishing Assembly: Stitch both pieces together making sure the fancy side is facing you. Put wrong sides facing each other. Ch1. Work 1 sc in each st around making sure to skip the ch1 spaces on front side piece. Join w/slst to ch1. Fasten off and weave all ends into work.
Design written on Wednesday, June 16, 2004. Copyright ©2004 By Julie A. Bolduc p102016
All items in our online shop ship free within the US only. I currently offer U.S. shipping only and it is from rural Maine. Delivery can vary from 2–14 days depending on your distance from Maine. Expedited shipping is not available.
Please note: I am now selling all of my paper bead making tools and other items from this web site using Paypal payments.
I have removed all of my paper bead making tools from Amazon. My Kindle crochet pattern books and paper template paperback books continue to be available on Amazon, as they are printed and fulfilled directly by Amazon. If you would like to shop my Etsy Store, follow the link in the header above.
Random Quick Tip!
Easy Scrap Saving!Line a small trash basket with an old pillowcase and use it to throw all of your scraps that are too small for other projects, into it. Then when the pillowcase is full, I mean really full, so full you can't fill it anymore, sew up the opening and use it for a Pillow Sham on your bed! You know, put it inside a pillow sham cover that comes with bedroom linen sets. You can also use the stuffing for other stuffed projects.