
Spring Fling Potholder
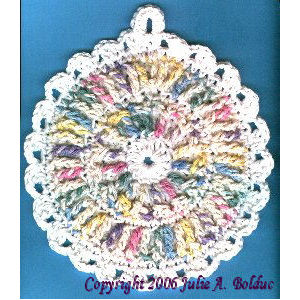 Designed By Julie A Bolduc
This potholder uses this month's special stitch, the Y-st. Also this potholder is made in an unusual way. The colorful yarn is worked in the front lps but then the tops of the stitches are joined with the back as the potholder is made.
Materials Needed:
1 Ball White Cotton Worsted Weight yarn.
Small amount of any Variegated Cotton Worsted Weight yarn. Peaches & Creme were used in the example
Size USH/8 5.00mm aluminum crochet hook.
Yarn Needle
Gauge: 4sc=1"
Yarn Thickness: 3mm
Finished Size: 8" diameter
Skill Level: Intermediate
Y-St: Tr in stitch indicated. Ch1, dc in center of tr post just made.
Instructions
RND 1: Ch3, join w/slst to first ch to form ring. Work 15 dc in ring. Join w/slst to first dc. Not the top of ch3.
RND 2: Working in back lps only. Ch3, dc in same st as slst. Work 2dc in each dc around. Join w/slst to top of ch3.
RND 3: Ch1. 2sc in next dc. *Sc in next dc. 2sc in next dc. Rep from * around. Join w/slst to ch1. Drop white to the back of work but do not fasten off. This is where it gets strange.
RND 2 On Front lp: Join variegated on front lp of rnd 2. Ch5, Dc in 3rd ch from hook. Y-st in next lp. Work one Y-St in each lp around. Join w/slst to 4th ch of ch5. Fasten off variegated.
RND 4: Pick up white. Now join the front to the back working through all 4 lps. Work a sc in each st and ch1 sp around. Join w/slst to first sc.
RND 5: Working in back lps only. Ch3, dc in same st as slst. Dc in each of the next 2 sc. *2dc in next sc. Dc in each of the next 2 sc. Rep from * around. Join w/slst to top of ch3.
RND 6: Work in both lps. Ch1, sc in same st as slst. Sc in each of the next 3dc. *2sc in next dc. Sc in each of the next 3 dc. Rep from* around. Join w/slst to ch1. Drop white to the back of work. do not fasten off.
RND 5 on front lps: Join variegated in front lps only. Ch4, dc in same lp. Sk next lp. *Dc, ch1, dc in next lp. Sk next lp. Rep from * around. Join w/slst to 3rd ch of ch4. Fasten off Variegated. Weave ends into work.
RND 6: Pick up white and repeat rnd 4. You may need to skip a couple of back stitches to make it all work. don't worry it will not show.
RND 7: Ch1, sc in same st as slst. *2dc in next st. Ch2. Sk next st. Sc in next st. Rep from * around. You will end up putting the last sc in the last stitch. At this point, ch5, turn. Work 8sc in this ch5 lp to form your hanger. slst to ch1 at beginning of rnd. Fasten off and weave all ends into work.
Design written on Wednesday, March 31, 1999. Copyright ©1999 by Julie A. Bolduc p102010
All items in our online shop ship free within the US only. I currently offer U.S. shipping only and it is from rural Maine. Delivery can vary from 2–14 days depending on your distance from Maine. Expedited shipping is not available.
Please note: I am now selling all of my paper bead making tools and other items from this web site using Paypal payments.
I have removed all of my paper bead making tools from Amazon. My Kindle crochet pattern books and paper template paperback books continue to be available on Amazon, as they are printed and fulfilled directly by Amazon. A limited number of paper bead making tools remain available on Etsy but I am not linking to those tools from this site.
Random Quick Tip!
Remember What ThreadWhile keeping track of what your ball of thread is when you open a new ball of thread, put the wrapper inside the ball. That way, if you need to buy more of the same stuff, you will know what it is.