
Wedding Bell Potholder
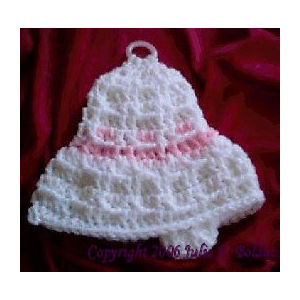 Designed by Julie A. Bolduc
This wedding bell potholder can be used by the servers at the reception. The pink band on it can be any color that is in the wedding. Wouldn't you rather see a pretty potholder that matches the color scheme at your reception than the old ragged holders you may see the kitchen workers using? You could also make the pink band with a variegated christmas colors yarn to use at Christmas time! Just make sure to use cotton yarn if they are actually going to be used as pot holders and not just something pretty to look at.
-
Materials Needed:
- One 1" wide plastic bone ring
- Worsted Weight yarn in the following colors
- White and colors in your wedding color scheme.
- Size H Aluminum Crochet Hook
- Gauge: 4sc=1" and 6sc rows=1"
- Finished Size: 7" wide at widest Part. 7" high not including ring.
- Skill Level: Beginner
- Oh Yeah, you could make this with size 10 crochet thread and size 7 hook to make little ornaments as well.
Instructions With white
RND 1.Tie yarn onto bone ring ch 1 and work 3 sc in ring. Ch1, turn. Work in front loops only. 2 sc in each of the 3 sts. Continue and work in the back lps of the first 3 sc. You are now going to work in rounds. Work 2 sc in each of the 3 back lps. Join w/ slst to first ch. You should now have 12 sc around.
RND 2: Ch2, hdc in each st around. Join w/slst to top of ch2.
RND 3: Ch3, dc in same st as slst. Ch2. *Sk next st, 2dc in next st. Ch2. Rep from * around. Join w/slst to top of ch3.
RND 4: Ch3, dc in dc. 2tr in skipped st of rnd 3 behind ch2 sp. *Dc in 2dc's. 2tr in skipped st of rnd 3 behind ch2 sp.
RND 5: ch3, Dc in dc, *Ch2 dc in 2dc. Ch2. Rep from * around. Join w/slst to top of ch3.
RND 6: Ch3, dc in dc. *Work 1 tr in each of the 2 tr of previous rnd working behind ch2 sp. Dc in 2 dc. Rep from * around.
RND 7: Rep RND 5. Drop white but do not break off.
RND 8: Tie on pink at same st as slst. Rep RND 4. Tie off pink.
RND 9: Pick up White. Ch3, dc in same st as slst. Ch2, *2dc in next dc, ch2. Rep from * around. Increases Made.
RND 10: Ch3, dc in dc, *Work 2 tr between dc in rnd 9 working behind ch2 sp. Dc in 2dc. Work 1 tr in each of the next 2 tr working behind ch2 sp. Dc in 2 dc. Rep from * around. Join W/ slst to top of ch3.
RND 11: Rep RND 5.
RND 12: Rep RND 6.
RND 13: Work in back lps only and slst in the first 17 sts. Work 4 dc in each of the next 2 sts. Slst into the next 18 sts. work 4 dc in each of the next 2 sts. Sl st in the last 17 sts. Slst to first slst to join. Break off yarn but leave at least 18" long to sew opening shut later after working on the front lps.
Tie yarn onto front lps starting at the first st of rnd. Sc in each st around. Tie off. Weave all ends into work. Sew bottom opening shut using a whip or overhand stitch. Embellish the top of the bell with pink or white bow if desired as a decoration or leave as is for a potholder.
Disclaimer
This potholder and every potholder will either burn or melt when it comes too close to flame or heating element on your stove or oven. Take care not to leave them too close in order to prevent personal bodily injury or property damage. I would make this with cotton yarn if it is actually going to be used and not just a pretty thing to look at.
Design Written in June 1998 Copyright © 1998 by Julie A. Bolduc p102003
All items in our online shop ship free within the US only. I currently offer U.S. shipping only and it is from rural Maine. Delivery can vary from 2–14 days depending on your distance from Maine. Expedited shipping is not available.
Please note: I am now selling all of my paper bead making tools and other items from this web site using Paypal payments.
I have removed all of my paper bead making tools from Amazon. My Kindle crochet pattern books and paper template paperback books continue to be available on Amazon, as they are printed and fulfilled directly by Amazon. If you would like to shop my Etsy Store, follow the link in the header above.
Random Quick Tip!
Ok to Download Bead Sheet ImagesI give you permission to download and use the images in either bead sheet generating program on the site, to your computer, for use in any software you may have on your computer to do with as you please. Just do not sell the images as they are. Use them in any project, then feel free to sell your finished projects. I would appreciate mentioning the website where you got the image for your project however, but it is not mandatory.