
Filet Pencil Cup
 Designed By Julie A. Bolduc
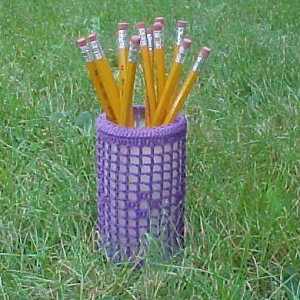
This pencil cup is made with a simple file pattern. So simple in fact, that a chart is not required for this. It starts out as a basic circle, then each round is done in straight basic filet with a touch of filled in filet half way up to the top. The work is secured with a row of gathering stitches through the last round to keep it in place.
- Materials Needed
- Small amount size 10 crochet cotton. Southmaid in purple was used in the example
- 1 empty Crystal Light Container with the lid removed.
- Size 7 steel crochet hook
- Tapestry Needle for weaving in ends.
- Yarn Thickness: 10thread
- Gauge: 10sc=1"
- Finished Size: 3"diam x4.5"h
- Skill Level: Beginner - Intermediate
Instructions
RND 1: Ch4, join w/slst to first ch to form ring. Ch3, 14dc in ring. Join w/slst to top of ch3. (15dc)
RND 2: Ch3. Dc in same st as slst. 2dc in each st around. Join w/slst to top of ch3. (30dc)
RND 3: Ch3. Dc in same st as slst. Dc in next st. *2dc in next st. Dc in next st. Rep from * around. Join w/slst to top of ch3. (45dc)
RND 4: Ch3. Dc in same st as slst. Dc in each of the next 2 sts. *2dc in next st. Dc in each of the next 2 sts. Rep from * around. Join w/slst to top of ch3. (60dc)
RND 5: Ch3. Dc in same st as slst. Dcin each of the next 3 sts. *2dc in next st. Dc in each of the next 3 sts. Rep from * around. Join w/slst to top of ch3. (75dc)
RND 6: Ch3. Dc in each st around. Join w/slst to top of ch3.
RND 7: Ch5. Sk 2 sts. *Dc in next st. Ch2. Sk 2 sts. Rep from * around. Join w/slst to 3rd ch of ch5.
RND 8-11: Ch5. *Dc in next dc. Ch2. Rep from * around. Join w/slst to 3rd ch of ch5.
RND 12: Ch5. Dc in next dc, ch2, three times. Dc in next dc. Dc in each of the next 2 chs. *Dc in next dc, ch2, four times. Dc in next dc. Dc in each of the next 2 chs. Rep from * around. Join w/slst to 3rd ch of ch5.
RND 13: Ch3, dc in each of the next 2 chs. Dc in next dc. Ch2. Dci n next dc. Ch2. Dc in next dc. Dc in each of the next 2 chs. Ch2. *Dc in next dc, dc in each of the next 2 chs. Dc in next dc. Ch2. Dc in next dc. Ch2. Dc in next dc. Dc in each of the next 2 chs. Ch2. Rep from * around. Join w/slst to top of ch3.
RND 14: Ch5. Sk next 2 dc. Dc in next dc. Ch2. Dc in next dc. Ch2. dc in next dc. Ch2. Sk next 2 dc. Dc in next dc. Dc in each of the next 2 chs. *Dc in next dc. Ch2. Sk next 2 dc. Dc in next dc. Ch2. Dc in next dc. Ch2. Dc in next dc. Ch2. Sk next 2dc. Dc in next dc. Dc in each of the next 2 chs. Rep from * around. Join w/slst to 3rd ch of ch5.
RND 15: Ch5. Dc in next dc, ch2, three times. Sk next 2 dc. Dc in next dc. Ch2. *Dc in next dc, ch2, four times. Sk next 2 dc. Dc in next dc. Ch2. Rep from * around. Join w/slst to 3rd ch of ch5.
RND 16-19: Ch5. *Dc in next dc. Ch2. Rep from * around. Join w/slst to 3rd ch of ch5.
RND 20: Ch3. Dc in each of the next 2 chs. *Dc in next dc. Dc in each of the next 2 chs. Rep from * around. Join w/slst to top of ch3.
RND 21: Ch3. Dc in each dc around. Join w/slst to top of ch3.
RND 22: Ch1. Sc in each of the next 2 sts. Insert hook in next st, pull up a lp, insert hook in next st, pull up a lp, yo, draw through all 3 lps on hook. ScDec made. *Sc in each of the next 3 sts. Scdec 1. Rep from * around. Join w/slst to ch1. Fasten off, leaving an 12" end.
Finishing: Turn work inside out and weave the starting end into work. Turn right side out and slip work onto cup. Weave end through last round using a gathering stitch, pull up tight and secure into place so that the top of the work forms a lip over the top edge of the cup.
Design written written on Monday, August 13, 2001. Copyright ©2001 By Julie A. Bolduc p117001
All items in our online shop ship free within the US only. I currently offer U.S. shipping only and it is from rural Maine. Delivery can vary from 2–14 days depending on your distance from Maine. Expedited shipping is not available.
Please note: I am now selling all of my paper bead making tools and other items from this web site using Paypal payments.
I have removed all of my paper bead making tools from Amazon. My Kindle crochet pattern books and paper template paperback books continue to be available on Amazon, as they are printed and fulfilled directly by Amazon. If you would like to shop my Etsy Store, follow the link in the header above.
Random Quick Tip!
Double Duty Patterns!If you have any fridgie (magnet) patterns you like which are made with ww yarn, make two of the same one with thread and attach to a pair of fish hook ear wires for fun earrings!