
Filet Star Ornament
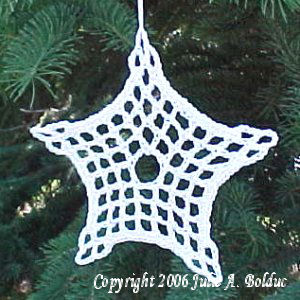 Designed By Julie A. Bolduc
This little star is a great project for beginners who are just starting to work in filet in the round. It is purely done in file until the last round. This would look wonderful on anyone's Christmas tree.
Materials Needed
Small amount white crochet cotton size 10.
Size 7 steel crochet hook
Tapestry Needle
Ornament Hanger
Yarn Thickness:
Yarn Thickness: 10thread
Gauge: 10sc=1"
Finished Size: 3¾"
Skill Level: Beginner in filet
Instructions
RND 1: Ch15. Join w/slst to first ch to form ring. Ch8. Dc in same st as slst. Ch2. Sk 2 chs. *Dc, ch5, dc, in next ch. Ch2. Sk 2chs. Rep from * around. Join w/slst to 3rd ch of ch8.
RND 2: Ch5. Sk 2 chs. Dc, ch5, dc in next ch. Ch2. Dc in next dc. Ch2. *Dc in next dc. Ch2, sk2 chs. Dc, ch5, dc in next ch. Ch2. Dc in next dc. Ch2. Rep from * around. Join w/slst to 3rd ch of ch5.
RND 3: Ch5. Dc in next dc. Ch2. Sk 2 chs. Dc, ch5, dc in next ch. Ch2. Dc in next dc. Ch2. Dc in next dc. Ch2. *Dc in next dc, ch2. Dc in next dc. Ch2. Sk 2 chs. Dc, ch5, dc in next ch. Ch2. Dc in next dc. Ch2. Dc in next dc. Ch2. Rep from * around. Join w/slst to 3rd ch of ch5.
RND4: Ch1. Sc in each of the next 2 chs. Sc in next dc. Sc in each of the next 2 chs. Sc in next dc. Dc in 1st ch of the next ch5 sp. Ch3. Sk next ch. Dc, ch5, dc in next ch of the same ch5 sp. Ch3. Dc in 5th ch of the same ch5 sp. Sc in next dc. Sc in each of the next 2 chs. Sc in next dc. Sc in each of the next 2 chs. Sc in next dc. Sc in each of the next 2 chs. *Sc in next dc. Sc in each of the next 2 chs. Sc in next dc. Sc in each of the next 2 chs. Sc in next dc. Dc in 1st ch of the next ch5 sp. Ch3. Sk next ch. Dc, ch5, dc in next ch of the same ch5 sp. Ch3. Dc in 5th ch of the same ch5 sp. Sc in next dc. Sc in each of the next 2 chs. Sc in next dc. Sc in each of the next 2 chs. Sc in next dc. Sc in each of the next 2 chs. Rep from * around. join w/slst to ch1. Fasten off, weave ends into back of work. Stiffen with favorite stiffener. Attach hanger and enjoy!
Design written on Thursday, July 26, 2001. Copyright ©2001 By Julie A. Bolduc p103021
All items in our online shop ship free within the US only. I currently offer U.S. shipping only and it is from rural Maine. Delivery can vary from 2–14 days depending on your distance from Maine. Expedited shipping is not available.
Please note: I am now selling all of my paper bead making tools and other items from this web site using Paypal payments.
I have removed all of my paper bead making tools from Amazon. My Kindle crochet pattern books and paper template paperback books continue to be available on Amazon, as they are printed and fulfilled directly by Amazon. If you would like to shop my Etsy Store, follow the link in the header above.
Random Quick Tip!
Ok to Download Bead Sheet ImagesI give you permission to download and use the images in either bead sheet generating program on the site, to your computer, for use in any software you may have on your computer to do with as you please. Just do not sell the images as they are. Use them in any project, then feel free to sell your finished projects. I would appreciate mentioning the website where you got the image for your project however, but it is not mandatory.