
Loopy Tree Ornament
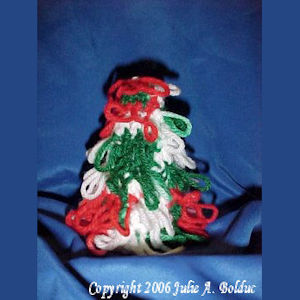 Designed By Julie A. Bolduc
This tree starts out as a simple circle then it is worked in rounds alternating a round of dc and a round of loop stitches. After making the initial circle, you turn your work so that you are working on the back side of the circle.
Materials Needed
Small amount Christmas Ombre worsted weight yarn. Red Heart brand was used.
Size J aluminum crochet hook
Polyester Fiberfill
Yarn needle
Yarn Thickness: 4mm
Gauge 4sc=1"
Finished Size: 5" high
Skill Level: Beginner
Loop Stitch (lp st)
This is how the loop stitch was done in this pattern.
Insert hook in stitch, wrap, yarn around forefinger to form a loop so that the long end of the yarn is toward you, then with your hook, pick up the yarn that is on your finger from the side closest to you. Draw this through your stitch but do not drop it from your finger. Then to secure this stitch wrap yarn around hook and draw through all loops on hook.
How to decrease (Dec)
YO, insert hook in stitch. Draw up a loop, yo draw through 2 loops on hook. Insert hook in next stitch, yo draw through stitch, yo draw yarn through all three loops on hook.
Instructions
RND 1: Ch3. Work 12dc in 3rd ch from hook. Join w/slst to first dc.
RND 2: Ch 3. Dc in same st as slst. 2dc in each dc around. Join w/slst to top of ch3.
RND 3: Turn so that you are now working in the opposite direction. Work 1 lpst in each st around.
RND 4: Ch3. Dc in each st around.
RND 5: Ch1. Work 1 lp st in each st around. Join w/slst to ch1.
Over the next few rounds, when you work on the dc rounds, you will be decreasing. But it will not be even.
RND 6: Ch3. Dc in each of the next 2 sts. Dec 1. *Dc in each of the next 3 sts. Dec1. Rep from * around. Join w/slst to top of ch3. (23sts around.)
RND 7: Ch1. Work 1 lp st in each st around. Join w/slst to ch1.
RND 8: Ch3. Dc in each of the next 2 sts. Dec1. *Dc in each of the next 3 sts. Dec1. Rep from * around. Join w/slst to top of ch3. (17sts.)
RND 9: Ch1. Work 1 lp st in each st around. Join w/slst to ch1.
RND 10: Ch3. Dc in each of the next 2 sts. Dec 1. *Dc in each of the next 3 sts. Dec1. Rep from * around. Join w/slst to top of ch3. (13sts).
RND 11: Ch1. Work 1 lp st in each st around. Join w/slst to ch1.
RND 12: Ch3. Ch3. Dc in each of the next 2 sts. Dec 1. *Dc in each of the next 3 sts. Dec1. Rep from * around. Join w/slst to top of ch3. (11sts)
RND 13: Ch1. work 1 lpst in each st around. Join w/slst to ch1.
RND 14: Ch3. Dc in next 2 sts. Dec1. Dc in each of the next 3 sts. Join w/slst to top of ch3. (7 sts)
RND 15: Ch1. work 1 lp st in each st around. Join w/slst to ch1. Stuff the tree. Fasten off leaving a 8" length. Gather up the last round and tighten. Then weave the end in. Decorate if you want to.
Design written on Sunday, November 07, 1999. Copyright ©1999 By Julie A. Bolduc p103015
All items in our online shop ship free within the US only. I currently offer U.S. shipping only and it is from rural Maine. Delivery can vary from 2–14 days depending on your distance from Maine. Expedited shipping is not available.
Please note: I am now selling all of my paper bead making tools and other items from this web site using Paypal payments.
I have removed all of my paper bead making tools from Amazon. My Kindle crochet pattern books and paper template paperback books continue to be available on Amazon, as they are printed and fulfilled directly by Amazon. If you would like to shop my Etsy Store, follow the link in the header above.
Random Quick Tip!
Control Your Craft ClutterIf you are like me and most crafters out there, you like to keep cardboard packaging and other packaging materials "just in case". Doing that often gets out of control if you don't save them in a controlled manner. Well what I do is a designate a special container to keep various materials in and when each container is full, I do not save any more of that particular item until my supply is almost gone. For example, empty cereal boxes for the cardboard. I keep my supply in a magazine holder. When it's full, I do not save more, until my supply of that wonderful cardboard is almost gone. My community recycles so I don't feel bad about getting rid of those empty boxes if I know I have a handful available to use whenever I need to.