
Lacy Bell Ornament
 Designed By Julie A. Bolduc
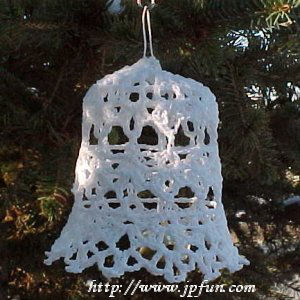
This lacy bell is fairly quick to make and would look great on your tree. You could also decorate a Christmas wreath with it. It has a jingle bell on the inside as the clapper. You could also use it in wedding decorations.
- Materials Needed
- Small amount white size 10 crochet cotton. Southmaid was used in the example
- 1 - 15mm gold tone jingle bell
- 5 oz paper cup
- plastic wrap
- Fabric Stiffener
- Size 7 steel crochet hook
- Gauge: 10 sc = 1"
- Finished Size: 3¾"h x 3¼"w
- Skill Level: Beginner
Instructions
RND 1: Ch6. Join w/slst to first ch to form ring. Ch4, counts as 1 dc and 1 ch. *Dc in ring. Ch1. Rep from * 10 times more. Join w/slst to 3rd ch of ch4. ( 12 dc around )
RND 2: Ch6 counts as 1 sc and ch5 lp. Dc in same st as slst. *Sc in next dc. Ch5. Dc in same st as last st. Rep from * around. Join w/slst to base of ch6.
RND 3: Slst in each of the next 3 chs of the first ch 5 lp. Ch5. dc in same ch5 sp. Ch1. *Dc, ch2, dc in next ch5 sp. Ch1. Rep from * around. Join w/slst to 3rd ch of ch5.
RND 4: Ch6. Dc in next dc. Ch1. *Dc in next dc. Ch3, dc in next dc. Ch1. Rep from * around. Join w/slst to 3rd ch of ch6.
RND 5: Slst into the first ch3 sp. Ch3, dc, ch4, 2dc in same ch3 sp. 2dc, ch4, 2dc in each ch3 sp around. Join w/slst to top of ch3.
RND 6: Slst in next dc. Slst in each of the next 2 chs of the next ch4 sp. Ch6. *Dc in next ch4 sp. Ch3. Rep from * around. Join w/slst to 3rd ch of ch6.
RND 7: Ch6, dc in same st as slst. Ch1. *Dc, ch3, dc in next dc. Ch1. Rep from * around. Join w/slst to 3rd ch of ch5.
RND 8: Slst into the first ch3 sp. Ch3, dc, ch4, 2dc in same ch3 sp. 2dc, ch4, 2dc in each ch3 sp around. Join w/slst to top of ch3.
RND 9: Rep rnd 6.
RND 10: Rep rnd 7.
RND 11: Rep rnd 8.
RND 12: Slst in next dc. Slst into the next ch4 sp. Ch6, dc, ch5, dc, ch3, dc in same ch3 sp. Dc, ch3, dc, ch5, dc, ch3, dc in each ch4 sp around. Join w/slst to 3rd ch of ch6. Fasten off and weave all ends into work.
Stiffen Bell
1. Rip some plastic wrap off of the roll and roll up into a ball to fit the bottom of the paper cup. Round it over. This will form the top of the bell.
2. Rip more plastic wrap and cover the whole cup and the ball of plastic you just made. Tape into place on the inside of the cup.
3. Protect the flat surface you plan to place your bell on while it dries with more plastic wrap.
4. Dip bell into fabric stiffener. Blot out excess stiffener with a paper towel.
5. Place wet bell over covered cup. Place on flat surface to dry over night. Allow at least 18 hours to dry completely.
6. String jingle bell on a scrap of thread and tie to the inside top of the bell. Attach hanger to top of bell.
Design written on Monday, November 20, 2000. Copyright ©2000 By Julie A. Bolduc f103017
All items in our online shop ship free within the US only. I currently offer U.S. shipping only and it is from rural Maine. Delivery can vary from 2–14 days depending on your distance from Maine. Expedited shipping is not available.
Please note: I am now selling all of my paper bead making tools and other items from this web site using Paypal payments.
I have removed all of my paper bead making tools from Amazon. My Kindle crochet pattern books and paper template paperback books continue to be available on Amazon, as they are printed and fulfilled directly by Amazon. If you would like to shop my Etsy Store, follow the link in the header above.
Random Quick Tip!
Keep Your Work Area TidyI use a trash container or little bowl next to me in the kitchen when I am cutting up veggies, to throw out scraps. When the small container is full, or when I am done preparing, I empty the container into the trash can. You can do the same in your craft room or area. Just keep a small container next to you while you work and put your scraps of what ever you are working with, into the small bin, then when you are done, you can empty the bin into your larger trash can or recycle bin.