
Crocheted Mini Snowflake
One of 10 Mini Snowflakes
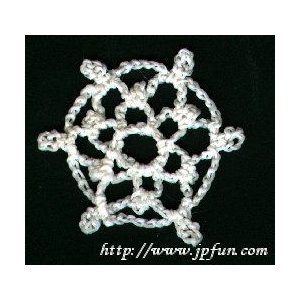 Designed by Julie A. Bolduc
This is just one of a collection of 10 mini snowflake patterns available from Just Plain Fun!
Materials Needed:
Small amount size 10 Knit-Cro-Sheen
Size 7 steel crochet hook
Fabric Stiffener
Straight Pins
Drying board, (a chunk of styrofoam works great)
Tapestry needle
Scissors
Thread Thickness: 10thread
Gauge: 8sc=1"
Finished Size: 1½" diameter
Skill Level: Beginner
Instructions
RND 1:Ch 12, join with a sl st in first ch to form ring. *Ch 6, sc in ring, repeat from * 4 times more. Ch 3. Dc in first ch of first ch 6 lp.
RND 2:Ch3, sl st in 3rd ch from hook to make a picot. Sl st in top of same lp. *Ch 8, sl st in next lp. Ch 3, sl st in 3rd ch from hk. Sl st in same lp. Repeat from * 4 times more. Ch 4, tr in bottom of first picot made.
RND 3:Ch 6, sl st in 6th ch from hk and in top of lp. (Picot made). *Ch 6, sl st in next lp. Make a ch 6 picot. Repeat from * 4 times more. Ch 6, sl st in base of first ch 6 picot made. Fasten off.
Finishing:
Weave ends of thread into work using the tapestry needle. Then dip the snowflake into the fabric stiffener and gently ring out the excess. Lay the snowflake down flat onto the foam board and pin into place. Allow to dry overnight. If you have a gas oven, you can place the snowflake in the oven and let the pilot dry it out. I do this and it takes half the time.Design Written in December 1998 Copyright ©1998 by Julie A. Bolduc all rights reserved f103007
All items in our online shop ship free within the US only. I currently offer U.S. shipping only and it is from rural Maine. Delivery can vary from 2–14 days depending on your distance from Maine. Expedited shipping is not available.
Please note: I am now selling all of my paper bead making tools and other items from this web site using Paypal payments.
I have removed all of my paper bead making tools from Amazon. My Kindle crochet pattern books and paper template paperback books continue to be available on Amazon, as they are printed and fulfilled directly by Amazon. If you would like to shop my Etsy Store, follow the link in the header above.
Random Quick Tip!
Easy Does it Hand SewingIf you use a needle and thread for alot of hand sewing and it seems to twist and knot on you alot. You can rub the thread onto a piece of bees wax. The wax coats the thread nicely and lets the thread glide through the fabric easily. If you are in a pinch and do not have bees wax, you can use an old stump from a candle or a matching color crayon. Bee's wax is best though cause it is all natural and will not break down your cotton thread.