
Pineapple Suncatcher
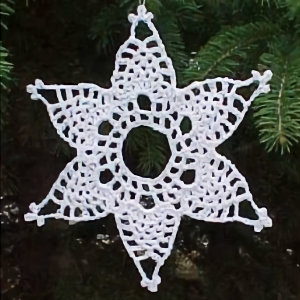 Designed By Julie A. Bolduc
This dainty suncatcher can also be used as an ornament if you use a smaller size thread. Or it can be used as a mini doily. Each point is made separately so be prepared to weave several ends in.
Materials Needed:
Small amount size 10 crochet cotton in white. Southmaid was used in the example.
Size 8steel crochet hook
Tapestry Needle for Weaving in Ends
Mixture of 1 part white glue to 1 part water for stiffener. Or you can use a commercially prepared fabric stiffener.
Hanging Thread. Nylon line is recommended.
Yarn Thickness: 10thread
Gauge: 10 sc=1"
Finished Size: 6" diameter
Skill Level: Intermediate
Instructions
RND 1: Ch36. Being Careful not to twist chain, join w/slst to first ch to form ring. Ch5. *Sk next ch. Dc in next ch, ch2. Rep from * around. Join w/slst to 3rd ch of ch5.
RND 2: Ch5. Dc in next dc. Ch5. Dc in next dc. Ch2. *Dc, ch2, dc in next dc. Ch2. Dc in next dc. Ch5. Dc in next dc. Ch2. Rep from * around. Dc in same st as slst of prev rnd, ch2. Join w/slst to 3rd ch of ch5.
RND 3: Ch1, counts as sc. Work the fol in the next ch5 sp. ((Dc, ch1) six times, dc.) Sc in next dc. Ch4. *Sc in next dc. Work the fol in the next ch5 sp. ((Dc, ch1) six times, dc). Sc in next dc, ch4. Rep from * around. Join w/slst to ch1.
RND 4: *Dc in next dc ch3. ((Sc in next dc, ch3)Five times). Dc in next dc. Sc in ch4 sp. Rep from * around. Join w/slst to top of first dc.
Points: From here you will work each point separately in rows.
First Point, ROW 1: Ch6. Sk first ch3 sp. ((Sc in next ch3 sp. Ch3.) three times) Sk next ch3 sp. Dc in next dc. Ch6, turn.
ROW 2: Sk first ch3 sp. ((Sc in next ch3 sp. Ch3.) two times). Sk next ch3 sp. Dc in next dc. Ch6, turn.
ROW 3: Sk first ch3 sp. Sc in next ch3 sp. Ch3. Sk next ch3 sp. Dc in next dc. Turn.
ROW 4: Ch7, slst to 4th ch from hook, ch5, slst in 5th ch from hook, ch4, slst in 4th ch from hook. Ch3. Slst in next dc. Fasten off and weave end into work.
Now work the following for each of the next 5 points.
Working to the left, Join thread in next dc of rnd 4.
Rep ROWs 1-4 of first point. When finished, weave all ends into back of work.
Stiffen, by dipping finished piece in stiffener and flatten, stretch and pin onto foam board. Allow to dry over night. Then attach hanger in one point and hang in window.
Design written on Saturday, May 13, 2000. Copyright ©2000 By Julie A. Bolduc f114004
All items in our online shop ship free within the US only. I currently offer U.S. shipping only and it is from rural Maine. Delivery can vary from 2–14 days depending on your distance from Maine. Expedited shipping is not available.
Please note: I am now selling all of my paper bead making tools and other items from this web site using Paypal payments.
I have removed all of my paper bead making tools from Amazon. My Kindle crochet pattern books and paper template paperback books continue to be available on Amazon, as they are printed and fulfilled directly by Amazon. If you would like to shop my Etsy Store, follow the link in the header above.
Random Quick Tip!
Sending Crochet HooksIf you need to send crochet hooks in the mail, you could flatten a paper towel tube, cut it so it is 7" long, then tape one end to seal it. I suggest using Fiber Tape for strength. Then put the hooks inside the tube, they should be wrapped in tissue paper, then seal up the other end. Then you can put this protective tube inside a 6"x9" envelope for sending through the mail. This way they should not work themselves out of the envelope. You could even send them in a business size envelope that is made manilla paper. That way it is not sooo big.