
Snowflake Centered Doily
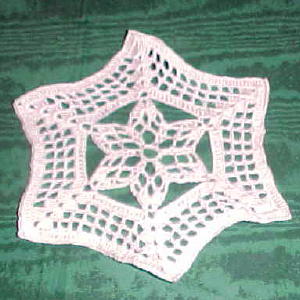 Designed By Julie A. Bolduc
This snowflake doily is fun and fairly easy to make. It is just the right size for a small bud vase to set on.
Materials Needed
Size 10 crochet cotton
Size 8 steel crochet hook
tapestry needle
Gauge: 10sc = 1"
Finished Size: 6" diam
Skill Level: Intermediate
Instructions
RND 1: Ch12. Join w/slst to first ch to form ring. Ch3. Dc in same st as slst. Ch5. Sk 1 ch. *2dc in next ch. Ch5. Sk 1 ch. Rep from * around. Join w/slst to top of ch3.
RND 2: Ch3. Dc in next dc. Ch3. Dc, ch5, dc in 3rd ch of the next ch5 sp. Ch3. *Dc in each of the next 2 dc. Ch3. Dc, ch5, dc in 3rd ch of the next ch5 sp. Ch3. Rep from * around. Join w/slst to top of ch3.
RND 3: Ch1. Sc in next dc. Ch3. Dc in next dc. 3dc, ch2, 3dc in next ch5 sp. Dc in next dc. Ch3. *Sc in each of the next 2 dc. Ch3. Dc in next dc. 3dc, ch2, 3dc in next ch5 sp. Dc in next dc. Ch3. Rep from * around. Join w/slst to ch1. Fasten off. Weave ends into back of work.
RND 4: Join thread in any of the ch2 spaces. Sc, ch5, sc in same sp. Ch11. *Sc, ch5, sc in next ch2 sp. Ch11. Rep from * around. Join w/slst to first sc.
RND 5: Ch3. 3dc, ch2, 3dc in next ch5 lp. Dc in next sc. Dc in each of the next 11 chs. *Dc in next sc. 3dc, ch2, 3dc in next ch5 lp. Dc in next sc. Dc in each of the next 11 chs. Rep from * around. Join w/slst to top of ch3.
RND 6: Ch5. Sk next 2 dc. (Dc in next dc. 3dc, ch2, 3dc in next ch2 sp. Dc in next dc.) Ch2. Sk next 2 dc. ((Dc in next dc. Ch2. Sk next 2dc. 4 times)) *Dc in next dc, ch2, sk next 2dc. Rep bet () once. Ch2. Sk next 2 dc. Rep bet (()) once. Rep from * around. Join w/slst to 3rd ch of ch5.
RND 7: Ch5. Sk next 2 dc. (Dc in next dc. 3dc, ch2, 3dc in next ch2 sp. Dc in next dc.) Ch2. Sk next 2 dc. ((Dc in next dc. Ch2. Sk next 2dc. 6 times)) *Dc in next dc, ch2, sk next 2dc. Rep bet () once. Ch2. Sk next 2 dc. Rep bet (()) once. Rep from * around. Join w/slst to 3rd ch of ch5.
RND 8: Ch5. Sk next 2 dc. (Dc in next dc. 3dc, ch2, 3dc in next ch2 sp. Dc in next dc.) Ch2. Sk next 2 dc. ((Dc in next dc. Ch2. Sk next 2dc. 8 times)) *Dc in next dc, ch2, sk next 2dc. Rep bet () once. Ch2. Sk next 2 dc. Rep bet (()) once. Rep from * around. Join w/slst to 3rd ch of ch5.
RND 9: Ch3. Dc in each dc and in each ch around. In each ch2 sp, work the following. 3dc, ch2, 3dc. When you get back to the beginning, join w/slst to top of ch3. Fasten off. Weave ends into back of work.
Press with hot iron and starch to flatten.
Design written on Saturday, November 30, 2002. Copyright © 2002 By Julie A. Bolduc f111008
All items in our online shop ship free within the US only. I currently offer U.S. shipping only and it is from rural Maine. Delivery can vary from 2–14 days depending on your distance from Maine. Expedited shipping is not available.
Please note: I am now selling all of my paper bead making tools and other items from this web site using Paypal payments.
I have removed all of my paper bead making tools from Amazon. My Kindle crochet pattern books and paper template paperback books continue to be available on Amazon, as they are printed and fulfilled directly by Amazon. If you would like to shop my Etsy Store, follow the link in the header above.
Random Quick Tip!
Seedling StarterIf you use paper dixie cups, the 3 oz size, you can make seed starters with them. Just push one of those tiny filters for resuable K cups in one of the cups, fill it with potting mix, place your seed in the center, cover with more soil. When the seed sprouts, pop the filter with the dirt out of the cut and place into your hole in the ground or next size up pot. This will prevent from having to disturb the roots. You can also recycle used store bought k cups this way. Just remove the insides from the k-cup and wash before using.