

Quilted Pumpkin Potholder
Designed by Julie A. Bolduc
This potholder is just an example of what you can do with the pumpkin motif that is on the potholder. This project is actually to give you a motif you can use for various different craft projects. You could use the motif for embroidery, painting, wood burning, cross stitch, quilting and more! The motif on this page is actually slightly bigger than actual size but if you print it on paper, it should fit inside the 8" x8" square. You can make it bigger or smaller by using a copier if you like.
- Materials Needed for one potholder
- Fabric 7"x7" white cotton square
- Fabric 8" x8" black cotton square
- Old towel for padding. Or something thick 7"x7" You may need more than one thickness if your towel is thin. Mine was so thin I used 4 layers.
- Embroidery floss 2 shades of Green and one shade of orange . I used scraps
- I had. I do not know what the color numbers or names are.
- 4 buttons ½" diameter
- Sewing thread to match fabric.
- Carbon paper
- Pencil
- Sewing Machine
Finished Size: 7"x7"
Skill Level: Beginner

Instructions
STEP 1: Print out the line drawing of the pumpkin. Make it any size you want as long as it is smaller than 8" x8" so that it will fit on your potholder.
STEP 2: Using the carbon paper and pencil, transfer the drawing onto the right side of the white fabric. Make sure it is centered.
STEP 3: Place the bigger square down on your working surface wrong side up. Then layer your padding on top of it centered. Then lay the front piece on top of the padding so that the edges line up evenly with the padding. Make sure the padding and the top piece are centered on the back piece. Pin or baste into place. You would be better off hand basting the layers together about 1" in from the edges. That way you can remove the hand stitches later. Basting is just so that the layers will not shift and move on you.STEP 4: Follow the picture to make your stitches. Quilt the pumkin itself in 3 strands orange. Use ¼" running stitches.
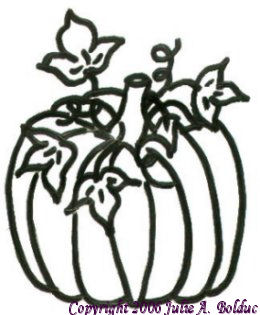
STEP 5: Using a back stitch with 3 strands of the darker green floss, stitch the outlines of the leaves and stem. Use 2 strands of the lighter shade of green for the curly tendrils.
STEP 6: After you are all done hand stitching the design. You will need to finish the edges. This is different. Thread your sewing machine so that the top thread is white and your bobbin thread is black. Set your machine to sew the widest satin stitch that it will do. Test on some scrap fabric until you have the desired effect.
STEP 7: Finishing the potholder. Fold over the back edges over the front edges and press with an iron. Then stitch the edges down using the satin stitch. Like a machine applique. You may need to go over it two times. I did.
Sew a button to each corner to hide flaws. If you do not want to use buttons, you could use small purchased appliques and hand sew them in place.
Design written on Wednesday, September 01, 1999. Copyright ©1999 by Julie A. Bolduc f126005
All items in our online shop ship free within the US only. I currently offer U.S. shipping only and it is from rural Maine. Delivery can vary from 2–14 days depending on your distance from Maine. Expedited shipping is not available.
Please note: I am now selling all of my paper bead making tools and other items from this web site using Paypal payments.
I have removed all of my paper bead making tools from Amazon. My Kindle crochet pattern books and paper template paperback books continue to be available on Amazon, as they are printed and fulfilled directly by Amazon. A limited number of paper bead making tools remain available on Etsy but I am not linking to those tools from this site.
Random Quick Tip!
Easy Scrap Saving!Line a small trash basket with an old pillowcase and use it to throw all of your scraps that are too small for other projects, into it. Then when the pillowcase is full, I mean really full, so full you can't fill it anymore, sew up the opening and use it for a Pillow Sham on your bed! You know, put it inside a pillow sham cover that comes with bedroom linen sets. You can also use the stuffing for other stuffed projects.